Saturday 29 December 2012

Robin Hood - Escape from Nottingham

The year of 2012 was rounded off with an annual get together in North Devon at Chas's. Our New Year's Eve games tend to be light hearted affairs and this years scenario was one of the best.

It was just another day in Nottingham, but King John and the Sheriff had laid on a feast of entertainment for the good people of the city. Not only would they get to see the Sheriff take the Lady Marion as his wife, to be married by the Bishop of Nottingham, but also as a little starter to the days celebrations, they would get to see Robin Hood executed by losing his head on the block. What fun, what joy!!

The Bishop of Nottingham on his way to marry the happy couple,The Sheriff and Maid Marion
The Bishop had to make his way to Nottingham through the forest road to Trent Bridge, just by the cricket ground, a new game invented by the peasants. Now that Robin Hood was in custody no trouble was expected, and the Bishop even travelled on foot to be able to swap pleasantry's with the locals he met on the journey.

Nottingham is on guard as the outlaw Robin Hood is due to be executed before the wedding.The road at Trent Bridge is heavily policed by the Sheriffs men.
The town was tense with expectation, surely Robin Hood would be able to stop this, surely something had to happen, but what?

In the centre of town King John, the Sheriff, Gisborne and the guard await Robin Hoods meeting with the axeman.
As the King and the Sheriff awaited Robin Hood's arrival in the square, the city guard became aware of large groups of peasants moving in the nearby forest. Were the natives restless? Was there a plan to rescue the outlaw? surely not!

But wait, is there a hint of trouble!
Then it started. The crowd that had gathered in the city square suddenly turned ugly. Robin's men had infiltrated the towns folk and were now attacking the guard. Someone threw a sword to Robin and the fight was on.
Robin makes a break for the wall supported by his merry men disguised as townsfolk
Robin Hood's men were desperately fighting to hold of the Sheriffs crossbows and spear men as they tried to fall back to the south tower. Equally the Sheriff was desperate to make sure that Hood would be recaptured, nothing would be allowed to spoil his day.

Little John leads the foresters in an ambush on the Bishops convoy
Meanwhile the Bishops guard was assaulted by a hail of archery delivered from the forest edge that decimated a unit of his crossbowmen. The remaining guard closed up on the Bishop's coach as Little John led a charge from the forest by the Merry Men.

Will Scarlet and Friar Tuck take the wall by the south tower to enable Robin's escape
At the same time Will Scarlet and Friar Tuck led a coup de main party to take and hold the south tower curtain wall and thus enable Robins small band to get away from the city. The plan seemed to be working like clockwork, or was it?

The fighting is fierce on the road between the Bishop's guard and Little John's men
All of a sudden things started to go wrong. The Bishops men gave as good as they got and as soon as the Merry Men closed in hand to hand the armour and swords of the Bishop's guard started to take effect. The guard was badly mauled, but the Bishop was on his way into town. He would have made a useful hostage for any future bargaining.

The Bishop's coach makes it into the city walls but only just
As the Bishop came careering in through the city gate, his carriage looking like a porcupine on wheels with all the arrow shafts sticking out of it. The Sheriff and King John's men started to win the battle in the town and on the wall.

Friar Tuck was struck and seen to fall from the battlements landing in a heap of straw and dung, that was fortunately well placed!!.

Robin's men were either captured or cut down as the fugitives fell back to the south tower and made their escape through the Trent to the safety of the forest beyond.

With Robin recaptured, Marion decided to rescue herself. Girl Power
And what of our hero, well he was last seen diving out of the way of the Bishops coach that got between him and the pursuing Sheriff's men. When they finally clambered over a rather shaken and distraught Bishop the outlaw was nowhere to be seen. Like wise the lady Marion deciding discretion being the better part of valour quietly armed herself and slipped past the guard at the gate to make her way into the forest.

The King and the Sheriff had won the battle, but, perhaps, not the war!

Thanks to Chas for setting up a great days entertainment, and to Ian, Clive, Nick, Steve and Vince for getting into character.

Happy 2013 to everyone
Jon

Sunday 9 December 2012

The Battle of Whipton Cross - Wars of the Roses

It is a common misconception that the far south west was a quiet backwater during the Wars of the Roses when one considers where the major clashes happened. The battle of Whipton Cross, a hamlet just outside of the City of Exeter must rank as one of the major clashes of this dynastic struggle between the Houses of Lancaster and York.


The Devon Wargames Group have a tradition of pulling together an annual Xmas game to include all club members, and this years event was our fictitious Wars of the Roses clash, where all members were asked to contribute at least one unit of troops and align themselves with one house or the other. The rules chosen to run our big game was Peter Pigs "Bloody Barons", and yesterday saw the two forces fight it out on a three table battle set up with hundreds of colourful troops flying banners for the various factions.

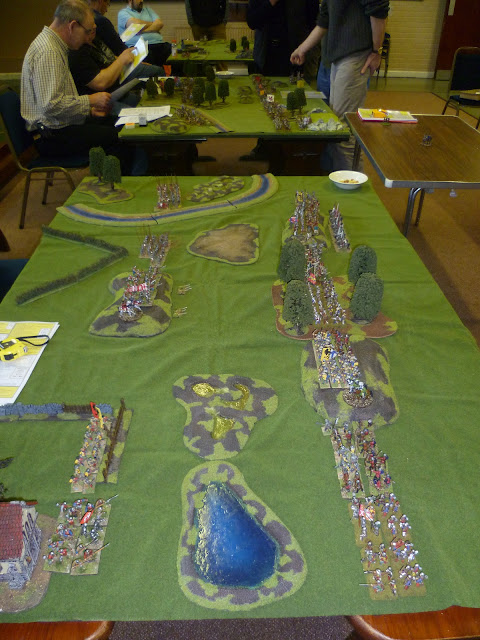
The Lancastrian left with the village of Whipton bottom left
The Centre table
The Lancastrian right - the quiet sector!!
The tables were set up as illustrated and with no apology from the author, captioned from the point of view of the Lancastrian House whom God has favoured.

"An army marches on its stomach"
As with all major campaigns it is really important to make sure your forces are well provisioned, and with the festive season well under way, a good supply of nibbles and mince pies were made readily available to commanders throughout the days battle.


Whilst the terrain was arranged the various troops of each faction were organised into Household, Retinue and Levy contingents, with the die rolls made to determine late arrivals on the field.


The commanders set up their respective forces and then the skulduggery and double dealing was sorted out. Bloody Barons has a set up procedure where the commanders can spend points on various aspects that might influence a Wars of the Roses campaign such as bribery, spying, route of march, supplies etc. depending on what priority the commander gives to these various aspects may give his forces an advantage over the enemy.

Well it seemed that the Yorkists were on their game as my commander none other than the Earl of Warwick found himself away from the field of battle when it all "kicked off". In addition several of our units who were ordered to take up strong defensive positions were led to the wrong parts of the field and found themselves out of position. Oh the fickle Gods of War!!

The forces arrayed on the left
With the forces set up, the battle swung into action. The Lancastrian plan was to hold the wings and smash the centre. The Yorkists went for holding their right, contest the centre and destroy the Lancastrian fores on their left at Whipton Cross moving to support the fight for the centre.

The centre set up
The clash in the centre when it came was fierce and bloody with the advantage swinging one way to the other, but eventually with gaps appearing in the Lancastian line the Yorkist pressure started to take control.

The hard pressed Lancastrian right - they shall not pass!!
Whilst both forces merely skirmished and scowled on the Lancastrian left, Warwick on the right faced an onslaught of Yorkists keen to take advantage of his troops poor dispositions and his apparent absence from the field. However as their forces closed on the Lancastrians they were met by a hail of well place arrows and crossbow bolts severely mauling the lead units.
As his forces were one by one overwhelmed, Warwick finally appeared receiving a roar of approval from his remaining troops. With defeat staring the Lancastrians in the face, honour demanded one final effort of resistance. 

The Yorkists prepare to assault Whipton Cross
The gallant Lancastian garrison of Whipton - Warwick's retinue with mercenary crossbows in support 
Warwick and his Household troops
Gaps start to appear in the Lancastrian centre as the Yorkists close
Desperate defence around Whipton as the Yorkist seek to crush all resistance
With threats of disloyalty and treachery breaking out across the front - we had a simple die roll to test to see if any commander wished to change sides at this point in the battle - Warwick seized the initiative leading his mercenary pikemen in one last desperate attack to dispute the crossing of the Whipton Brook by lead elements of the Yorkist left as they turned to support their comrades in the centre.
Warwick places himself in the front rank as he leads a crashing charge by his mercenary pikes which smash the leading Yorkists as they attempt to cross the Whipton brook.
The fighting here became desperate and bloody as men struggled in the slippery muddy brook to maintain their footing whilst trying to kill the man in front. Warwick plunged into the mass of enemy bill men cutting a swathe through them with battle axe in hand until the Yorkists had had enough and broke in rout to the safety of their side of the brook.

This was but a minor glorious interlude in what turned into a crushing victory for the House of York. Lancastrian resistance in the South West was at end. The field would be left to Henry Tudor to contest, but that as they say is another story.

The day was a great feast of wargaming. Bloody Barons gave a good account of itself when used to run a large club game with over 12 players on three tables attempting to stay in sync with each other as the battle evolved. The club really did itself proud with all members making a contribution to the days fun and our big game provided an excellent close to our games for 2012. We are all looking forward to going bigger and better in 2013.

A happy and safe Christmas to all .

Sunday 11 November 2012

Barbarossa - WW2 - Flames of War

November saw Chas, myself and Andy B put on a scenario from Operation Barbarossa, using "Flames of War" rules. Jason joined in because no one else wanted him.

It was a 3000 point a side game, with the Soviets fielding a battalion of tanks (including 5 monster T 35's and 11 T 28's) and a battalion of infantry, all with attendant supporting arms.

The German force was more modest, with a tank company, supported by a company of panzer grenadiers and attendant supporting forces (including priority air support - Stuka schwerpunkte).

The scenario was an "encounter" battle, so half the platoons on both sides were deployed on the table, with the rest being delayed and scattered reserves (roll for entry from turn 3 and dice for where each platoon arrives).

Initial deployment saw 33 Soviet tanks facing 6 panzer III's and 3 armoured cars. The Soviets raced forward and the German pioneers raced onto the central hill objective and did what pioneers do best, dig in !

The German armoured cars were wiped out by a company of T 28's. The German motorcycle recce on the other side of the table saw two companies of Soviet light tanks and decided discretion was the better part of valour.

The German tanks went firm and shot it out with the T 26's and BT 5's, inflicting serious loses and sending a company of T 26's and one of BT 5's packing. The wave attack rule came into play and the BT 5's reappeared, at full strength, as if by magic !

A platoon of T 35's and a horde of infantry joined the Soviets and a platoon of Stugs bolstered the Germans facing the T 28's (much to Chas's relief).


The shooting contest started again and the new BT 5 and T 35 companies suffered the same fate.


The above picture shows the point when the Soviets conceded. Chas can be seen leaving the scene, suppressing his laughter.

Quality beat the quantity this time, but it might have been a different story if the Soviets had refused to engaged in a long range shooting contest and had just rushed the German positions.


Just to show there were no hard feelings the Soviet players posed for a picture with "Chuckling Chas".

Vince

Barbarossa 2012 - Flames of War

On the other table this month we had a beautiful collection of early Russian Front Flames of War action going on. The models and terrain capturing the feel of Russia 1941. Enjoy some wargamers porn, including Jason
Masses of Russian Light Armour
German units looking on in awe
Masses of Russian Heavy Armour. You've got to love those multiple turrets!
German Infantry preparing to see off the Russian Horde

Battle of the River Plate - Shipbase III

Following on from last month's naval theme, this month's game was a re-run of the Battle of the River Plate, using the Shipbase III computer rules.
The Scenario and set up
This famous action has always been an interesting battle for me as it pitches the much more heavily armed "Pocket Battleship" KMS Graf Spee with her 11inch main guns against the more lightly armed HMS Ajax, HMNZS Achilles and HMS Exeter armed with 6inch and 8inch guns respectively.
The starting positions
The set up recreates the movie of the battle with the Royal Navy units sighting smoke on the horizon and closing on the Graf Spee at battle stations. With the tactics agreed amongst the RN players both sides opened fire and started to take evasive action as they did. The early success went to the Kiwis with Achilles getting in some 6" strikes on Graf Spee's armoured belt causing minor damage.

First hits on the Graf Spee caused by HMNZS Achilles
The victory conditions required by each side gave objectives that helped recreate events on the day. Whilst the Graf Spee would receive points for sinking the RN cruisers, 3 for Exeter and 2 each for Achilles and Ajax, the RN would get 1 point for each 7 knots of speed reduction caused to Graf Spee.
Thus a balance of objectives were constantly on each sides minds as the engagement progressed.

Commodore Harwood's Ajax (out of picture), Achilles and Exeter close on Graf Spee.
HMS Exeter sustaining hits early on
 With HMS Exeter having the potential to cause the most damage to Graf Spee, it was not surprising when the German ship concentrated her fire on the 8" cruiser. Luckily for Exeter the initial hits were caused by the lighter guns on Graf Spee, and the damage was minimal.

HMS Exeter under fire and taking hits
The concentration of gunnery against Exeter allowed Achilles and Ajax to close slightly and both started to register hits. The damage caused was not devastating but was cumulative and the mighty Graf Spee started to slow under this barrage, whilst maintaining her attention on Exeter.

Ajax and Achilles seek to draw attention away from Exeter under fire in the background
As the range closed the Royal Navy gunners got their mark and it was only a matter of time that all three ships began to hit Graf Spee simultaneously. The great ship shuddered under the barrage and she struggled to make headway. Admiral Langsdorf was now committed to a slugging match as he could no longer choose to run.

Graf Spee takes hits from all the RN ships, knocking out guns and reducing her speed
With Graf Spee at 60% damage and her speed down to 7 knots it could only be a matter of time before the fatal blow sealed her fate. The great ship would not go down without a fight. Up to now she had concentrated her fire on Exeter with all her available guns. Luckily for Exeter she had evaded hits from the 11" guns but the smaller secondary guns had caused 30% damage and reduced her speed to about 10 knots.
HMS Exeter takes an 11inch hit  from Graf Spee

The end of the game came with a crescendo of gunnery. The three RN cruisers all struck the Spee as one with an 8" hit from Exeter penetrating the deck and sealing the Spee's fate. As the Graf Spee settled and began to sink, her response was already on its way. HMS Exeter finally took a hit from Graf Spee's 11 inch battery which penetrated the deck causing two fires and 25% damage. HMS Exeter was badly damaged but afloat.

Honours then to the Commonwealth and Commodore Harwood. It seemed a fitting game to play this close to Remembrance Sunday and with HMS Exeter representing a brave ship that has carried the name of our local city and had as part of her crew on that day one of our junior club members Grand Dad aboard.

Thanks to all involved in a fun days wargaming.

Sunday 14 October 2012

Bey vs Mountbatten, November 1940

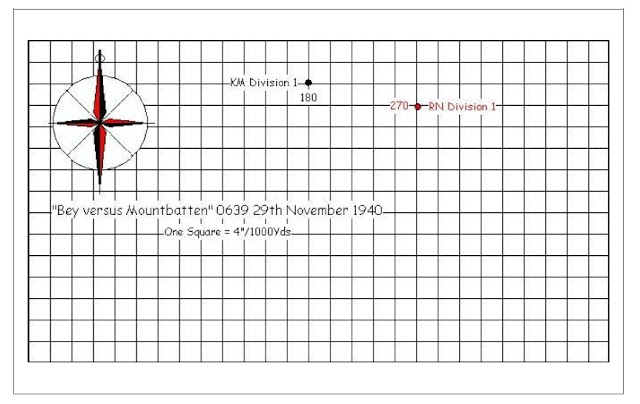
After originally planning to run an Age of Sail naval scenario using my "Clear for Action" computer rules, I was having problems saving my game scenarios. So with one day to go before our club meet and not wanting to not have a game ready to go I turned to a very reliable set of rules namely "Shipbase III" which after a bit of fine tuning, halving the gunnery to allow for battle conditions, always give a fun game. Admittedly this wasn't going to be Age of sail, but instead of frigates we had destroyers in action.


The scenario above is my adaption of the scenario created and available on Len's Naval Warfare page for his rules "Fire on the Water"

http://fireonthewaters.tripod.com/index.htm


HMS Jersey (Early in the war)

KMS Karl Galster
This scenario recreates one of the early clashes between the Royal Navy and Kriegsmarine in home waters, and being a Devon based club we are very familiar with the conditions that can occur in our home waters. This action happened on a murky moonless night off Cornwall, with the Royal Navy force sailing towards the gun flashes observed as the German force was getting stuck in to some armed tugs. In this game we were running our add on command and control and night fighting rules.

Both forces were on set speeds and courses until the enemy was spotted. Then forces could react according to their standing orders. Only then could either Bey or Mountbatten start to signal to their respective commands to adopt different sailing and gunnery tactics. As this was a dark foggy night with primitive signalling techniques compared to modern times, things were likely to go wrong!!

This was going to be a "knife fight" of a battle as the ranges were often only one to two thousand yards, and as wargamers we were not just going to shoot and scoot, things were likely to be bloody.
HMS Jupiter having turned after launching her torpedoes is spotted by Karl Galster and is badly hit

We had the RN force on alert and they duly spotted the KM ships before the Germans knew they were there. Jack and Charlie standing in for Mountbatten had opted for fire star shell and launch torpedoes as their reaction to spotting the enemy. As the KM destroyers cruised on their current course a star shell was observed on their port side and HMS Jupiter launched 5 torpedoes at the German ships. The Jupiter only launched half her possible strike of 10 fish and at slow speed setting they would take two turns to cross the KM course by which time the RN force was spotted.
The German reaction was swift, with orders to open fire on first contact, increase speed to 30 knots and turn across the enemy. Sadly for the Germans only the third ship in line, Hans Lody, reacted to the new order, with her two consorts sailing on in line ahead. However the gun barrage from Lody at HMS Jupiter was devastating at about 2000 yards causing 60% damage and three fires, forcing her out of the line limping along at 6 knots.

Admiral Bey in KMS Karl Galster leads KMS Richard Beitzen as a star shell is observed to port (top left)
The RN torpedo's all missed and both sides were well aware of each others presence and desperate to bring order to their reactions. Both sides had ships out of formation and command and so had to fight with what was available. Both sides opted for a combination of gunnery and torpedoes to settle the affair and after thee turns of action, two RN destroyers Jupiter and Kashmir and KMS Hans Lody were sunk.

At this stage discretion would normally have been the better part of valour, and with the ranges increased and the darkness re-enveloping the forces our respective commanders may well have withdrawn to lick their wounds. We however are wargamers keen to try out our rules to destruction, and so we turned towards our respective foe and armed the torpedoes.

The survivors of the first round turn in for the final clash
As both sides charged towards each other on opposite tracks the night grew lighter and visibility increased. Three RN destroyers vs two Kriegsmarine with signal lamps flashing to order launch remaining torpedoes, fire the guns and take evasive action.

At one stage there were 26 torpedoes in the water and that was going to hurt at 2000 yards. The first ship hit was the Karl Galster, two torpedoes broke her back and she sank fast. However her six torpedoes caused five hits sinking the two rearward RN ships and having a dud hit the lead. The gunnery from both remaining ships was ineffective and they were both limping away when the final salvo of British torpedoes found their mark. KMS Richard Beitzen had avoided nine fish but it only took one to seal her fate.

The RN force (nearest) charge in for the final pass with their KM foes
With daylight approaching HMS Jackal limped away at 3 knots badly damaged but afloat and keen to avoid the Luftwaffe on her desperate return to Blighty, but that as they say is another story.

Thanks to Jack and Charlie for a very enjoyable afternoons gaming.