Sunday 14 April 2013

Saturday 13th April, Devon Wargames Club Game , Exeter...

Sudan Game loosely based on the Battle of Tamai... using the Blackpowder Rules system...

The British forces (approx 3,300 men) fresh from their victory at El Teb (2nd) a fortnight later are advancing towards the primitive settlements of Tamanieb and Tamai, they are to be met on the field of battle by 9,000-12,000 Bija tribesmen...

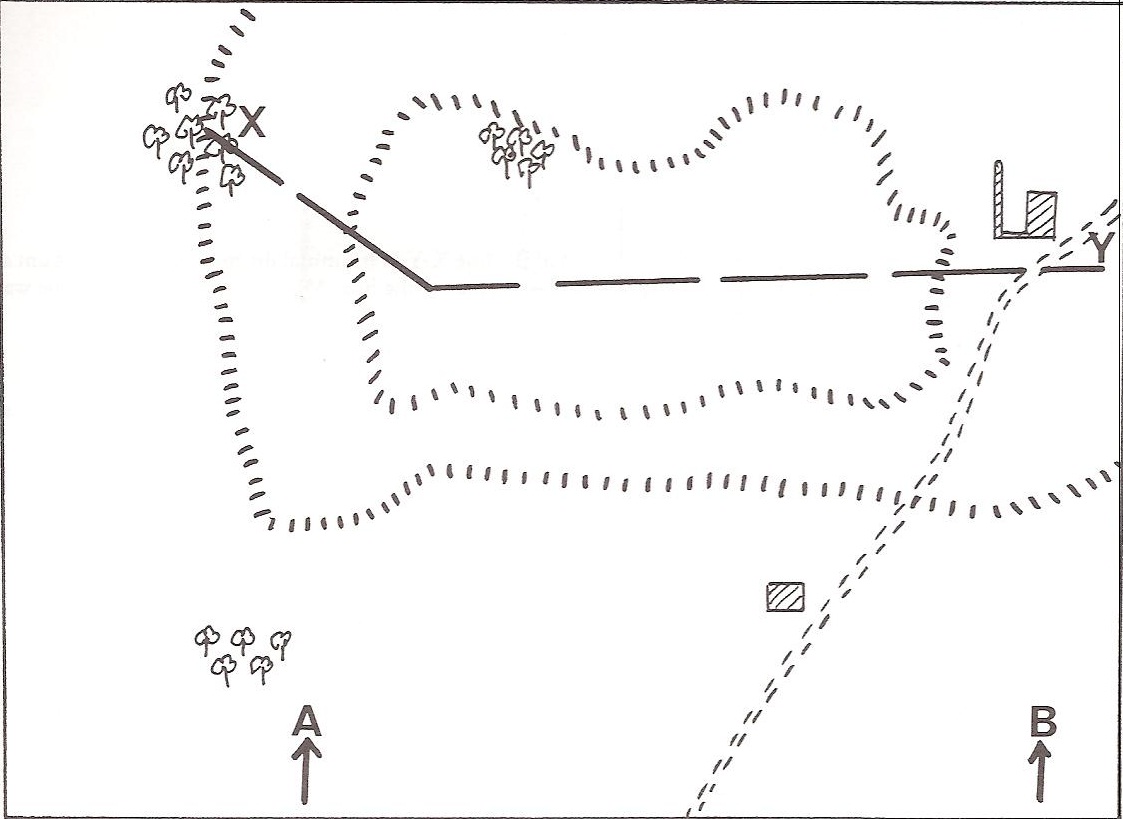
The battle was fought on an 8'x6' board, objectives:- the British having to enter at one end and exit the other with the majority of the force intact, The Dervish, Kill the British...

"View from the British end, looking up at the Donga and the broken ground leading to the slope towards the edge of the board."

"View from the hill looking down"


The British forces GOC: Maj.Gen Sir Gerald Graham VC KCB (Gus and Vince)
1st Brigade - Brig. Gen. Sir Redvers Buller VC KCMG CB (Vince)
3rd Battalion The Kings Royal Rifle Corps (KRRC)
1st Battalion The Gordon Highlanders
2nd Battalion Royal Irish Fusiliers
6th Battery Scottish Div. RA.
2nd Brigade - Maj.Gen. J. Davis (Gus)
Royal Marines (RMLI)
1st Battalion The Black Watch
1st Battalion The Yorks and Lancaster Reg.
Naval Brigade with Gatling & Nordfelts
Cavalry Brigade - Brig.Gen. H. Stewart CB (Vince)
10th Hussars
19th Hussars
Mounted Infantry Company


Mahdists Forces Commanded by Muhammad Bey Musa Ibrahim (Chas, Steve, and Andy) with 9,000-12,000 Bija Tribesmen...
Flag 1 (Andy)
6 x Bija Spearmen Warband Fanatics...
Flag 2 (Steve)
5 x Bija Spearmen Warband Fanatics...
2 x Bija Riflemen Skirmishers...
Flag 3 (Chas)
5 x Sudanese Spearmen Warband...
2 x Sudanese Rifle Warband...
Flag 4 (Chas)
4 x Sudanese Camel Spear Warband Skirmish...
1 x Sudanese Camel Rifle Warband Skirmish...
1 x Baggara Cavalry Rifle Warband...
1 x Baggara Cavalry Spear Warband...


The British arrive turn one, The cavalry are ordered to advance to the Donga and cover the advance, but fail, and only complete one advance, 1st Brigade advances onto the table one move in march column, 2nd Brigade fair better with a bounding move onto the table in Brigade square, reaching the Donga they realise its a bit steeper than they thought and will take one full move to cross next turn...
In turn one Chas's 3rdFlag was trailing the British column on the left, this was determined by the players having to roll a D8 & D6 for their arrival point, but 24" away from the British forces...

Second turn saw Gus get some of his Brigade across the Donga, but landed in rough ground, and deployed into line with the most of his force, Vince deployed his gun and 19th Hussars covering the rear dust clouds, the remainder of his brigade advances on...

"Gus and the 2nd Brigade crossing the Donga"

"Vince and 1st Brigade"


It was at this point that Steve and his 2ndFlag arrive on the table 24" away to the front of Gus' Brigade... Steady Lads... mark your aim...
there were some shots fired across the open ground to no real avail... just getting the aim right of course...

As the next turn came on, the remainder of the Mahdist forces arrived on board, Andy and his Bija on the hill, accompanied by Chas's Cavalry Flag, it was at this point that Chas chose to bring on the Sudanese in the rear areas of the British advance faced by only a gun and some hussars...

"Andy arrives with the rest of the Bija tribe..."

"View of the Sudanese coming of the hill and the state of affairs of the front of the line"

"Gus and his RN & Marines firing line..."

"Steady... form your line... Are you sure you don't want to be in square?"

Vince manages to get his 1st Brigade Infantry back to his guns to meet the arrival of the Sudanese in the rear areas...

"Thats what caused the dust cloud..."

"Mmmm, what to do next... Good old Bullers..."

"Take aim... Fire!!!!"

Vince's firing line rips the Sudanese to pieces and halts their advance, however Andy's Bija are swarming over the Donga at a fast rate of knots...

"Advance in the heat of the day..."

The Mahdists players seem to co-ordinate their attacks in the next few turns, Steve's Flag charges, Gus firing line, Chas annoys the hussars and threatens the centre area and Gus's flank with his camels and cavalry, his Sudanese Infantry Flag are just bullet bait for 1st Brigade, and Andy's flag storms through the Donga areas, cutting through the dismounted infantry scouts in the Donga and manages to catch Vince's Gordons in the rear, can the British survive this onslaught...

"We may be in trouble here..."

"Tough fight along the line..."

"Bloody camels..."

With Bloody hand to hand fighting between Gus and Steve, Gus's line broke with the RN and Nordfelt falling to Spears, then the RMLI, leaving just the Yorks, holding the line with the Black Watch yet to feel cold steel...

"Yorks Hold.... Hold..."

Then the Yorks Break as well, allowing the Bija to swarm around the rear of the remaining line...

"Yorks break... Bija swarming..."

The 19th charge several times cutting through various Mahdist Cavalry and Camel units, pushing back the Cavalry flag by themselves, but the bell is tolling...

"19th Charge..."
Meanwhile back at the 1st Brigade, Vince has been taken in the rear by Andy, to clarify the Bija, hits the Irish and the Gordons in the rear whilst shooting the hell out of the Sudanese to their front, the Gordons hold their morale, but the Irish, just because Vince slurred their good names, broke and fled...

"Gordons left on their own..."

After another round of combat the Hussars were making short work of the Sudanese infantry, cutting them down with flank charges, but the Gordons then broke not withstanding the swarms of Bija around them and still being in line, leaving just the KRRC on the hill with the RA, however as soon as the Gordons broke the RA packed up and went home as well... Gus's Black Watch retired back to the Donda to take cover from the next onslaught, however the RN and gatling couldn't move, and were left as the rearguard, before being swamped by the remaining camels and Bija to their front...

"Bullers and his remaining troops on a small rise..."

"Black Watch fall back to the Donga, leaving the RN as rearguard..."

At this point the British realised their lot was up, and we finished the game, a resounding victory for the Mahdi and his followers, lots of British dead on the field of battle, did I mention squares???
Newspaper reports "Massacre at Tamai"...
However the Hussars are able to dine out on their exploits in the field, having made several valiant charges...

All General officers have been reprimanded and are confined to the Mess until the next time...

thanks to Andy (Bija), Chas (the Mahdi), Gus (Gen Davis), Steve (Muhammed) & Vince (Bullers) for a great game and a fun day... 


Battle of Grant's Hill 1776 - Carnage & Glory II AWI

Isn't it great to be able to combine the old with the new and create something really cool? Well today at the Devon Wargames Group we played a scenario taken from a classic book I have had in my collection for very many years, "Scenarios for Wargames" by Charles Stewart Grant, run using the computer rules Carnage & Glory II for the Seven Years Wars and AWI.

This was a bit of a test case for me as I wanted to see how easy it would be to do a throw together scenario with someone elses figure collection in 28mm, a scale I don't usually play, being an 18mm fan. I was also eager to try out the AWI version of these rules, having been very pleased with the game used for my Napoleonics.


So on to the game which I selected based on the limitations of the collection of figures we had to play with. The scenario we used was No.7 Rear Slope, which allowed a smaller force, the Americans to defend a rear slope position against a stronger British force.


The American Army was tasked with holding the hill top to the west of the road, with just under half of their units on the front slope beyond the line X - Y, leaving the remainder out of sight on the rear slope. The British tasked with taking control of that hill top were to deploy between the points A - B.


Definition of control would be the force with more good order units on the hill at game end (when we stopped playing), or in the case of equal forces, that would be a British victory. Or the army whose force morale dropped below 75% break point first, being automatically deemed to have lost as this would force them to vacate the field.

So the Americans were commanded by General Butler who being a charismatic chap took direct command of the three battalions of militia, pictured below.The general was obviously a good friend of General Greene, as he decided to place them on the front of his position supported by Colonel Lynch's riflemen, with orders to give the British two good volleys before getting out of the way.

The 1st Virginia Militia - this was not to be their finest day
Lynch's Rifles skirmish in font of the 2nd Virginia Militia
The American position with the three militia battalions and Finley's Artillery
As the American army took post the sound of fifes and drums drifted up from the valley as the British army under General Grey formed up before them. The Royal Artillery 6 pounder section unlimbered at 300 paces and commenced firing as if to signal the commencement of hostilities.

The British host prepares to advance
The British cannonade was answered by Finley's Continental battery and as the Light Infantry in open order moved swiftly up the hill, Lynch's Rifles started to seek out the officers and nco's in the British ranks.
The 16th Light Dragoons positioned on the British left move out to the flank
The British attack plan became evident as the massed battalions of hatmen covered by the "Light Bobs" converged on the centre of the American line whilst the Grenadiers and Light Dragoons "felt out" the American right flank. All the while supported by a continual fire from the artillery in the centre.

The British Grenadiers and Light Dragoons converge on the 1st Virginia Militia
The British Light Infantry were keen to close with the enemy and quickly brought the riflemen into an assault. The rifles not bayonet armed themselves broke before contact was made and never stopped running despite a half hearted rally attempt from General Stevens, whose unpopularity with the men was making itself obvious.

The 2nd Virginia Militia look on as Lynch's Rifle are caught by the swift advance of the Light Bobs
As General Butler pushed forward the 5th Virginia Continentals to cover the gap in the lines, Finley's two guns kept up a barrage of roundshot and case on the follow up battalions of Redcoats as they trudged laboriously up the slope.

The 2nd Virginia Militia brace themselves as Lynch's Rifles break for the rear, with General Butler steadying the ranks
As things hotted up in the centre the British general probed the American left flank on the road with the 5th Foot pinning down two Continental Line units brought forward to the road. What was this American commander doing, was this an attempt to counterattack?

The British 5th Foot advance on the American left flank, faced off by two continental battalions
On the American right flank the battle suddenly took a turn for the worst. General Butler could see his flank was in trouble with all but one of his Continental battalions brought forward, and the Grenadiers supported by the Light Dragoons closing on the Virginia Militia. He decided to attempt to take control of the militia by joining them whilst bringing forward his last reserve the 1st Maryland Continentals.
The fight for the centre with Finley's guns the centre of resistance
The plan seemed to be working as the militia cheered at the arrival of Butler in their ranks and prepared to meet the charge of the Grenadiers and the cavalry. The Grenadiers assaulted first with a ragged volley followed by three hurrahs. As General Butler called for steadiness the rear rank broke, and all was flight. The militia soon out ran the puffing Grenadiers, but the 16th Light Dragoons slammed into the rabble. Over one hundred militia threw down their arms and General Butler was knocked from his horse and captured. The remaining fugitives broke to the rear as the Marylanders wheeled in front of the Grenadiers but with British Light Dragoons to their rear engaged in mopping up militia men. 
Behind you!!
It was only a matter of time when the cavalry would return. A staff officer quickly assumed command and attempted to regain some order.

The British momentum becomes unstoppable
With events on the American right assuming disastrous proportions, the centre seemed to loose heart as the remaining continentals seemed to wilt under the British assault. The end came with the army breaking and falling back on the road. The hero of the hour for the Americans being Finley's guns who having seen off two charges by the British Light Infantry and the 31st Foot was seen firing away as the infantry pulled back.

Finley's Guns firing to the last.
The battle lasted eight moves or two hours of fighting, and the casualty lists below after allowing for returned stragglers tells the tale. The honours on the British side went to the Combined Grenadiers who emerged unscathed but triumphant. 
The American plan to use the militia to blunt the British attack failed and the misplacement of their continental infantry left the militia men in an untenable position.

The scenario played well and the rule set proved itself once again. We all enjoyed their playability and I found them very easy to pull a quick game together. Once again the surprises that the system throws out makes them a fun set to play.

Thanks to Jack, Ollie and Tom for a very entertaining day.