Thursday 24 March 2016

Power to the People - "Winter of 79", Living on the Frontline


Our third and final game played at this month's club was a 1970's clash between Marxist rebels and the forces of the Crown in the streets of Exeter as Chas and Vince played out this "What if" scenario using "Winter of 79" Living on the Front Line - follow the link below for details. Our Home Affairs Correspondent, Vince, was on the scene to post this report on the action.

http://winterof79.blogspot.co.uk/

Many thanks to Chas for running the game today. The rules were "Winter of '79" Living on the Front Line. The scenario pitched the Exeter Socialist Republic against the government troops and militia.


Needless to say Chas took the "leftie scum" and I played the good guys.


The game opened with the army entering Whipton (see map below) and facing road blocks lined with treasonous Marxists. A few rounds of HE from the supporting Centurion thinned them out somewhat, although a couple of rocket propelled grenades (rpgs) bouncing off the front plate cooled the crews enthusiasm for leading the charge. 


Area map of the City of Exeter showing where all the trouble kicked off and the entry area of the army via Whipton 


A Saracen and supporting squad hosed down another barricade and another Saracen sought to flank the militia. A hail of rpg rounds saw it taking cover behind a wall.


A row of terraced houses disgorged a mass of left leaning locals, supported by a Ferret armoured car. The government flanking force looked in danger of being outflanked and a vicious fire-fight and melee developed. Seeing their comrades in need, the Centurion crashed the barricade and routed the militia behind it. On a roll, it steamed into the next obstacle, as the other Saracen moved up to fire into the flank of the "Brixton Ganja Boys". 


With the writing on the wall First Citizen Chas called for his coach and with a wave to his men, left for the M5 motorway.


A fun game and a fast paced set of rules. The actions are card driven and probably aimed at a game with around 20 a side (we had many more than that). Most actions and reactions are by dice type roll offs against your opponent. The bigger the dice the better and this is linked to troop quality, with modifiers moving the size of die thrown up or down. This works pretty well and always allows the underdog a chance. It certainly makes for a fast and furious game.


About half of shooting results just lead to targets ducking or being suppressed, which seems about right to me. Also the option to "duck" in response to fire improves survivability.


All in all a nice set of rules that capture the feel of the period of unrest during the "Winter of Discontent", and what might have happened if history had taken a different path.

Vince

Friday 18 March 2016

Battle of Newmarket 1864


Cadets at Newmarket - Engraving by H.C. Edwards

With the grim prospect of a 20th Century only day at the Devon Wargames Club this March, it was down to me to save the day, either that or I could stay in Wales and save myself the petrol money and spend it all on sugary drinks. However a trip back to civilisation was necessary as despite my success in forcing my remaining relatives to buy me some birthday presents I had singularly failed to make them actually post any to me, a bit of thinking was now required on what I could put on at the club so that I could make the most of my journey.


I chose to play one of the scenarios from the Fire and Fury website


I had no previous experience of any of these games and they all appeared to be designed to be played on a small 4' x 4' table which initially seemed a bit odd but actually worked out very well. I also wanted to play a stand alone battle rather than a section of a bigger one and so picked out the Battle of Newmarket. Given my vast knowledge of everything I already had a vague idea that it was a Union defeat and that some idiot was in charge which therefore made my choice for this as a club game ideal.

US Set-up Positions

In 1864 Grant ordered Maj.G. Franz Sigel to support his offensive by clearing out the Shenandoah Valley. Initially he faced little resistance until Maj.G. John Breckinridge formed whatever troops he could muster into a force to stop him. They met near New Market, Sigel had placed skirmishers out in front and so Breckinridge attacked and drove them back whilst sending his cavalry around to the right.  Continuing the advance the two main lines drew near and engaged in firing at each other, over time the more numerous Union troops were getting the upper hand and Sigel decided to attack and finish them off. Under pressure Breckinridge reluctantly ordered in his last reserve, the Virginia Military Cadets, to plug the gaps in the front line and combined with the seasoned veterans along side them they managed to stem the Union advance. Sigel's attack faltered and with the Cadets in the lead, the Confederates attacked again and broke the Union line, winning the day.


Soundly defeated, Sigel withdrew, (to be replaced by Hunter) and left the Valley still in Confederate hands until later on in that year when Philip Sheridan was appointed by Grant to do the job properly.

Confederate Set-up Positions

Our game starts with the Union skirmishers falling back under pressure from the first line of Confederate infantry. The scenario does however leave a few things unclear so we had to make some assumptions. 


None of the artillery is allocated to a command so that means the Corps commander has to give them orders, as neither of them are on board at the beginning of the game we allowed the Union to start limbered if required so that they could escape with the infantry. The Confederates obviously chose to be un-limbered given their starting position.


Union cavalry would be armed with breech-loaders by now but we decided against it, I would suggest anyone else should do the same. 


Game 1.

Steve H was playing as Sigel and Steve L was Breckinridge. 

The Union have to retreat everyone back to the road/farm house line before they can go on the offensive and Steve H managed to get all of his activation throws to be at least a 5 or more and so managed it easily, Steve L brought all his troops on table and gradually advanced under gun fire up to the Union Line, by the time he arrived, there was now a double line of Blue coats waiting for him. Combined with the copious quantity of 9’s Steve H had been throwing to whittle him down on the way in, it was agreed that he was doomed and we ended the game.  


After a chat we set it up again, I took over as the Union and Steve H volunteered to be the Confederates.


Game 2


This time around both of my two front units failed to move at all and so got charged by ‘ordes of ‘orrible Rebs , needless to say only six stands out of fourteen eventually made it back to the safety of my line, fortunately the other two units just about made it back in one piece. 


We now had the same scenario as in the first game and I suppose to some extent, as in the actual battle; a Union line waiting the Rebel attack .My guns had also been thinning out the Rebel advance until that is, I threw a 10, which was a little inconvenient and so with the two sides standing off against each other Steve very kindly agreed to make a game of it and threw in anyone that could reach. Somehow the Union line held mainly through their weight of numbers, meanwhile my uninvolved troops/guns continued to fire into various rebel units skulking behind the fighting, softening them up for later, it was about now that the VMI cadets were shot to bits by another 10, shame.


As my two big original units hadn't made it back in a state to be of any use other than supports, this meant having to charge in instead with the green 12th West Virginia, which unfortunately was both low on ammo and disordered, it didn't go well. Fortunately to their right my centre had by now thrown back the rebels they were fighting and in their turn heroically counter charged, sweeping them from the field and then smashed into the softened up troops behind.  

There were just too many Union units and no large Rebel ones at all so weight of numbers told again, I pushed back what was left of the Confederate infantry, even the 12th West Virginia managed to win against some weakened dismounted cavalry.

This game went right to the final 8th turn and the remaining Union Brigades were just over the required invisible line to give me the additional victory points on offer. 


If Steve had sat back and made me attack him as Siegel had done then I am not so sure how it would have gone given my initial losses however his extra VP’s were behind my defensive position so it might have been closer than we initially thought . 


Overall then not bad, second time around that is, and now that I have written up the actual events then the scenario does appear much more understandable. It does to some extent depend on how many Union Brigades make it back as the Rebels don’t have anything over five stands big in their army.


Whilst researching the game I did find an alternative version on the Net from “Iron Brigade “written by Mike Willegal (pages 17-19) which you could use instead for the set up. (Watch out for those breech loaders!)


Union Set up:
Confederate set up:

Iron Brigade:


This has been a Mr Steve production.

Sunday 13 March 2016

Attack on Le Haut Perrier - I Aint Been Shot Mum

Taxi! - Scots Guards tanks move up to the start line with their attached infantry
This scenario, entitled "Let's get at the Bastards" - Scenario 12 is taken from the "Cymru Am Byth" Welsh Guards at War scenario book produced by the Too Fat Lardies


and you can link to more details about both at JJ's Wargames in my post that preceded the game.


Taken from the Welsh Guards Regimental History;
“About half-way to the village a line of hedges crossed their front leading on the left into a sunken
lane. No.7 platoon now occupied this hedge-line while Leuchars went to contact No.8 Platoon, who
were farther forward on the left of No.7. They had reached the outskirts of the village and had
silenced a machine gun post when two more opened on them and held them up. One of the Scots
Guards tanks supporting them was blown up on a mine, but the crew managed to escape and
continued to fight as infantry for the rest of the battle. A dug-in Panther and a mortar were also
spotted and Sergeant E.Williams moved his platoon back to the sunken road. 

Meanwhile Lieutenant D.J.C. Stevenson with Sergeant R.G.Fowles and five guardsmen had made an eventful sortie from No.7 Platoon. Re-crossing the main road, they had crept forward to the first two houses, knocked out a machine-gun post and killed two snipers. They were about to rejoin their platoon when a nearby Panther sent an armour-piercing shell into the house they had cleared, and killed Guardsman W.E. Bowen who was standing with his back to the wall; the rest got back safely. Shortly after this the enemy put down a mortar concentration mixed with smoke which screened the village and suggested that either a counter-attack or a withdrawal was being covered. While the smoke lasted the company could see little, but the Scots Guards tanks worked out to their flank, spotted three Panthers moving and promptly knocked out all three. The Company were loud in praise of the work done by the 3rd Battalion Scots Guards that day – ‘Even when their tanks were hit (they lost two) they came and joined the infantry. One Lance-Sergeant borrowed No.7 Platoons PIAT to go and deal with a Panther which had knocked out his tank. He came back with his hand bleeding and the PIAT in pieces. Then he grabbed a rifle and went back again. That was the last I saw of him.’

“When the smoke-screen lifted the company advanced on the village and entered now without much
opposition, killing a few Germans who remained and taking nine prisoners. No.8 Platoon went to the
far end of the village and hardly reached their objective when ‘the ominous clank of tank tracks was
heard on the road, and round the corner of a hedge came one more Panther. Its huge gun was
swinging from side to side, the tank commander was looking out of the top and had obviously seen
nothing. The first two shots from No,8 Platoon’s PIAT missed, but the third hit it squarely beside the
driver’s seat, a loud explosion occurred and immediately flames burst from the crippled tank. In a very few seconds the fire was ranging and ammunition started exploding. Only one of the crew got out and he was promptly ‘seen off’ by a light machine gun. Nobody was in the mood for taking prisoners.”

Scenario map showing the two German set up boxes centred around the farm buildings of Le Haut Perrier on a sloping ridge
The picture below, taken on the IPad, shows the five German platoon group positions, corresponding to the map above with the British set to enter from the northern table edge.

Players terrain and objective notes adjusted for IABSM v3:

Map & Terrain
Le Haut Perrier is nothing more than a minuscule collection of farm buildings that does not even feature on the smallest scale maps. Its importance was due entirely to its position atop a rise in the rolling terrain that gave excellent views across all the surrounding countryside.
The hedges are relatively light, whilst the farm buildings are of solid stone construction and provide good cover. One of the lanes running east west is partially sunken on the southern side, this will provide good cover for any troops in it.

Objective: Take (British)/Hold (German) Le Haut Perrier


Players order of battle and force notes adjusted for IABSM v3:

Elements of 9th SS Hohenstauffen
One Big Man  Level (III)
One Big Man  Level (II)

Platoon One
Two MMG teams (3 crew each)

Platoon Two
Two MMG teams (3 crew each)

Platoon Three
Two MMG teams (3 crew each)

Panzer One - Morale 3
Three Panther A tanks, dug in

Panzer Two - Morale 3
Three Panther A tanks

Mortars
Two 80mm mortars off-table with three pre-registered target points (Use IPad to record aiming points)


German Player Notes:
  • Support weapons, such as mortars or HMGs, will only move when activated by a Big Man or if they come under close range small arms fire. They may move or fire in a turn but never do both.
  • Tripod‐mounted weapons like medium or heavy machine guns will be unable to move if reduced to a crew of one.
  • Light support weapons, such as LMGs or light mortar teams, will generally be considered part of an infantry platoon. When they do operate independently they move with the same number of Actions (4) as a full strength section of their troop type.
  • The Germans deploy their units in two deployment areas, as marked on the map as A and B. They MUST deploy at least two whole platoon sized units in each deployment zone. Both sides are on blinds when the game commences.
  • One platoon of German tanks must be dug in; all of their infantry may be as well.
  • The hedges in this area are not dense bocage, but remove one dice from any unit moving through them.
  • The side that holds Le Haut Perrier at the end of the game wins.

The lead British elements enter the table on blinds with the first platoons spotted by the German defenders visible
3 Company, 1st Welsh Guards
Big Men
Lieutenant D.R Leuchars (Level IV)
Lieutenant D.J.C.Stevenson (Level III)
Sergeant E. Williams (Level III)
Sergeant R.G. Fowles (Level III)

Platoon Seven
Two rifle sections (8 men each)
One PIAT (2 man crew)

Platoon Eight
Three rifle sections
One PIAT (2 man crew)

Platoon Nine
Three rifle sections
One PIAT (2 man crew)

Elements of 3rd Scots Guards Morale 3
Troop One (Command Troop)
Three Churchill tanks (Two Churchill VIIs, one Chuchill V CS)
Troop Two
Three Churchill tanks (Churchill VI's)
Troop Three 
Three Churchill tanks (Churchill VI's)


HEAVY ARMOUR: Some tanks, such as the Matilda II, Tiger or Churchill may be designated as having particularly heavy all‐round armour protection. These tanks will roll one additional Armour dice when fired at from the flank or rear.

British Player Notes: 
  • The British start the game on the northern table edge.
  • Both sides are on blinds when the game commences.
  • The British have two additional dummy blinds to use.
  • The hedges in this area are not dense bocage, but remove one dice from any unit moving through them.

The view up hill from the British lines
As part of the setting up for this action and given the very cluttered nature of the terrain I wanted to keep the use of blinds to a minimum so had the Germans set up their platoon blinds out of sight of the British players and photographed their set up on the IPad together with the positions of their pre-registered mortar strikes.

Once recorded all the German markers were removed, using the IPad as a reference and thus the British were presented with an empty battlefield with just their blinds moving across the fields, with the Germans able to spot from their hidden positions.

Close Normandy terrain providing plenty of cover for friend and foe alike
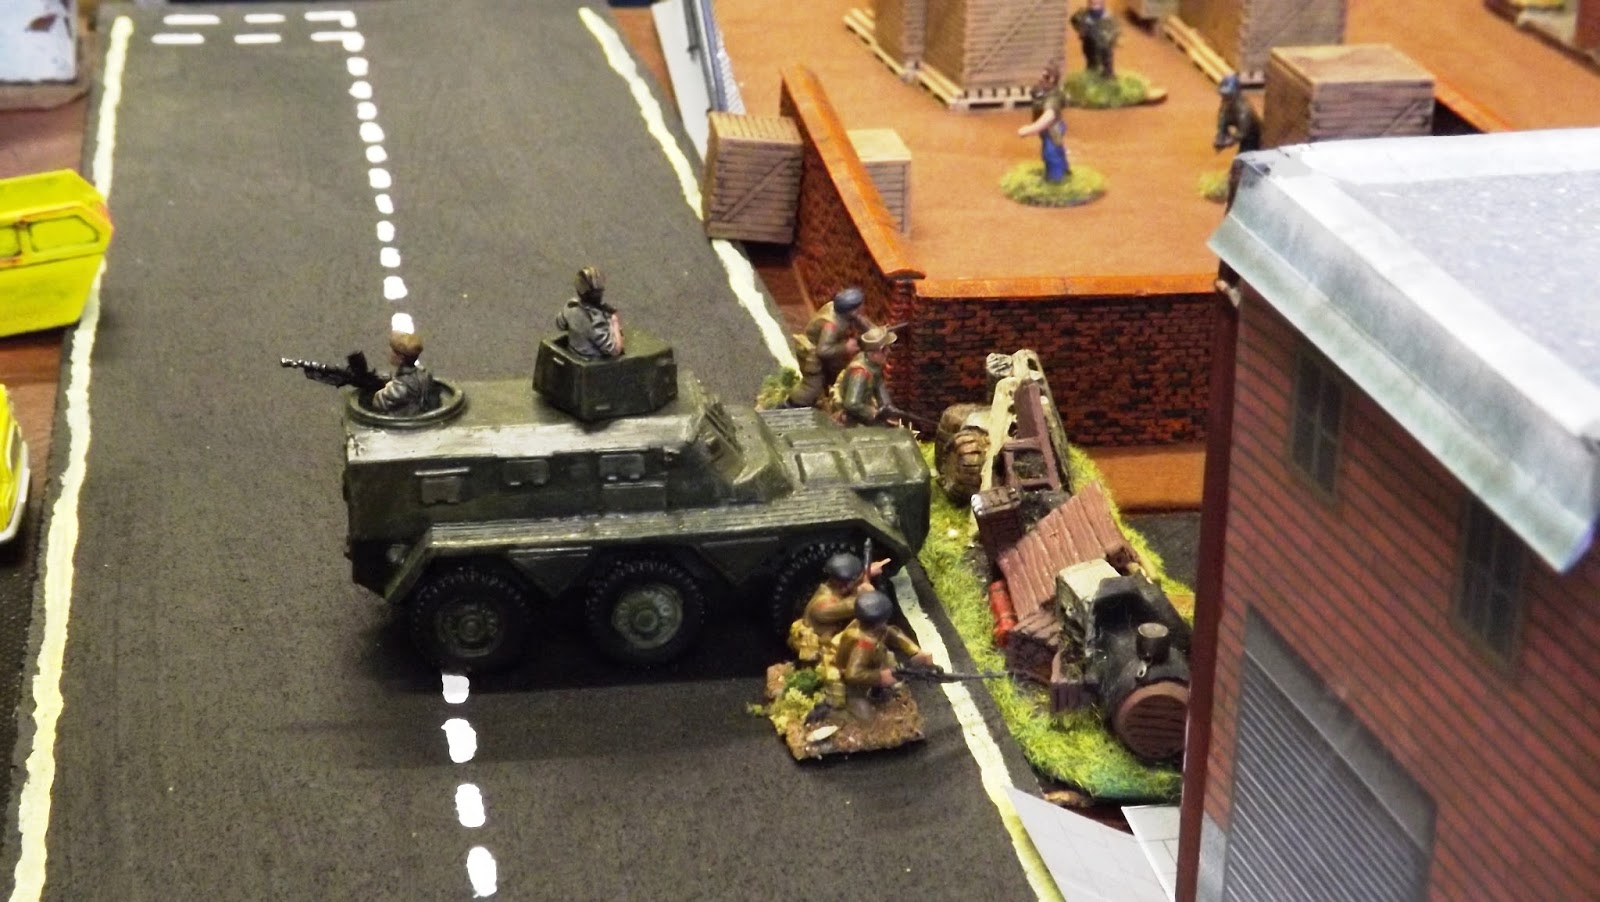
The German's opted for a balanced three up (6 x dug MG42 MMGs) forward in and around the farm, with Panthers on each flank, the right flank being dug in.

Scots Guards Churchill tanks on over-watch as their comrades move out into the neighbouring fields
The British attack plan rather presupposes a move to bring the force to bear on a point in the German line looking to overwhelm it quickly and take out the other parts piecemeal, as is what happened. The tricky bit is getting to grips with the defenders without suffering too much on the way in, and there as the Great Bard would say "lies the rub of it".

It's quiet - To quiet!
As the British forces entered the table using their two dummy blinds to disguise the line of attack, the German defenders spent the first few turns scanning the hedgerows down hill trying to spot the obvious sounds of enemy tanks and any supports.

Panthers dug in above the farm open fire and take return fire from the lumbering British tanks
Very soon the first Churchill tanks were spotted looking like first year débutantes nervously making their way towards the dance floor. As well as tanks, the first two platoons of British infantry were soon spotted moving, two up, looking to get to the cover of the sunken lane.

The German positions were well dug in and camouflaged
Radios crackled within German lines as the dug in Panthers on the right flank opened fire on the lead Churchill troop. The first shot ploughed harmlessly into the ground in front of the first vehicle causing an urgent rebuke for more care  and attention from the SS tank commander to his gunner.

The gunner responded with a round that smacked into the front of the first Churchill and shot vertically upwards leaving the enemy tank unharmed. However the Scots Guards troop leaders relief was soon short lived as the other two Panthers opened up with aimed fire at the other two tanks in his command.

Their armour saved them from complete destruction, but left one immobilised permanently and the other temporarily but with impaired movement, plus the shock to their crews didn't help with their chances of returning the fire. Not surprisingly when they had their opportunity to respond the first vehicle smoke rounds appeared to their front aimed at giving them some respite.

The lead British tanks take casualties, shock and damage as the Guards infantry sprint to the sunken lane
The poor old Welsh Guards were were getting a bit of battle inoculation as their lead platoon suddenly found themselves under mortar fire as they crossed the open field to their front, causing the survivors to sprint to the cover of the hedge on the sunken lane looking to regroup.

The dash to the hedge line only served to be a jump from the frying pan into the fire as two previously unspotted machine gun bunkers opened fire on the hapless Guardsmen, adding to their distress with further casualties and shock.

The Welsh Guards infantry come under whithering machine gun fire across the lane 
The British infantry commander was desperately in need of a bit of support from his "tankies", but they had a fight of their own going on, whilst aware of the need to close in on the German machine gun nests and help suppress them.

As if things couldn't get worse! The second Panther platoon move in on the Scots Guards flank
Meanwhile the second Guards infantry platoon taking advantage of the attention being paid to their comrades took advantage of it to make their way forward on the German extreme right flank, making the sunken lane pretty much intact.

The Welsh have established a lodgement in the farm, clearing the MG nests, but the attacks stalls in the face of heavy casualties
The Guardsmen were well aware that they had to break in amongst the cover of the buildings while using some of the tanks to keep the Panthers on the hill focused in their direction whilst also using some to support the infantry.

Making use of the smoke from the first tank casualties together with that of the defensive smoke rounds laid, the second troop moved through their comrades and brought HE fire onto the German MG nests on the sunken lane causing casualties and shocks.

The Welsh Guards used the respite given by their tanks to regroup and add to the pinning fire as one section sprinted over the lane through a neighbouring orchard and took the first MG nest in the flank and rear.

The dug in Panther platoon provided valuable support to their infantry in the farm area
Whilst the attack in the centre was going on the third troop of Scots Churchills duked it out with the dug in Panthers, causing multiple hits on the enemy platoon commanders vehicle but remaining one shock away from causing the German commander to bail out.

Whist the German tanks were occupied with this duel, the second platoon of Welsh Guards desperately tried to plant a PIAT bomb onto the nearest German tank from their position on the sunken lane, but it struck harmlessly against the earthwork around the tank.

The British attack is halted with the survivors looking to disengage. The opposing tank platoons face off across the hill side as the battle subsides in the centre
Sensing the distress of the British attack the SS commander pulled in his forces from the German left to counter attack the Guardsmen. This saw the second Panther platoon edge their way towards the flank of the British tank attack whilst two MG42 teams relocated into the farm barns to secure the centre.

The Welsh Guards section that had cleared the first bunker then took out its neighbour and got a lodgement in one of the barns, but by then the attack had stalled with too many infantry casualties littering the nearby fields and the Scots looking likely to be caught in the vice of two platoons of Panther tanks one on each flank,

And that was, as they say, that with the British attack stopped in its tracks.

This game was bad day at the office for the Brits, with their attack managing to find the dug in Panthers rather than their mobile comrades, and with their dice failing miserably to save casualties, only by an uncanny ability for the Germans to do the opposite.

I think we were generous on the cover we gave the British moving through the hedges and trees that break up the terrain; usually making them an 'okay' to 'poor' target on the IABSM fire table. On reflection I would make the sunken lane a 'poor' target environment along its length in front of the farm giving a jump off point for the Brits that make it across the field to the front of the buildings.

The Churchill proved a tough opponent taking hits that would automatically brew Shermans and Cromwells and the use of 'Engage' orders with aimed shooting certainly kept the Panthers on the hill busy fending off their shots.

A very nice afternoon spent battling in the Normandy countryside provided great sport before the rugby match of this year's Six Nations competition was caught up with in the pub afterwards.
Thanks to Ian, Steve, Steve M., and new member Bob for providing the entertainment.