A blog for the Devon Wargames Group, which meets on the second Saturday of each month at the Whipton Institute, 16 Whipton Village Road, Whipton, Exeter, EX4 8AW.
Doors open at 10.30am.
Mr Steve dug out his Sikh Wars collection this week to entertain us with a game of the new Général d'Armée 2, (GDA 2) the follow up to the successful GDA 1 from Dave and Christopher Brown and published by Reisswitz Press and available through the Too Fat Lardies web site.
Much pouring over rules and crib sheets entailed as this was the first game of GDA 2 for some of us and the rules are still relatively new to all of us and so not surprisingly the play was not entirely intuitive, but from my own impression, having a copy of and having played GDA 1, much of the new set will be very familiar to those with a similar experience, with tweaks to various aspects such as the options for commanders and aide-de-camp tokens, the new scouting rules and pre-set brigadier command qualities for example.
This AAR will not attempt to give an overview of GDA 2, but rather an impression, this being my first go with the rules, and mindful that there are several very informative overviews of the rules in blog and video format that those interested can check out.
For our game, we had a straight forward attack (British) and defence (Sikh) encounter with both sides having a reinforcement potential later in the game, and seeing the Sikh line anchored on a small village, the British objective.
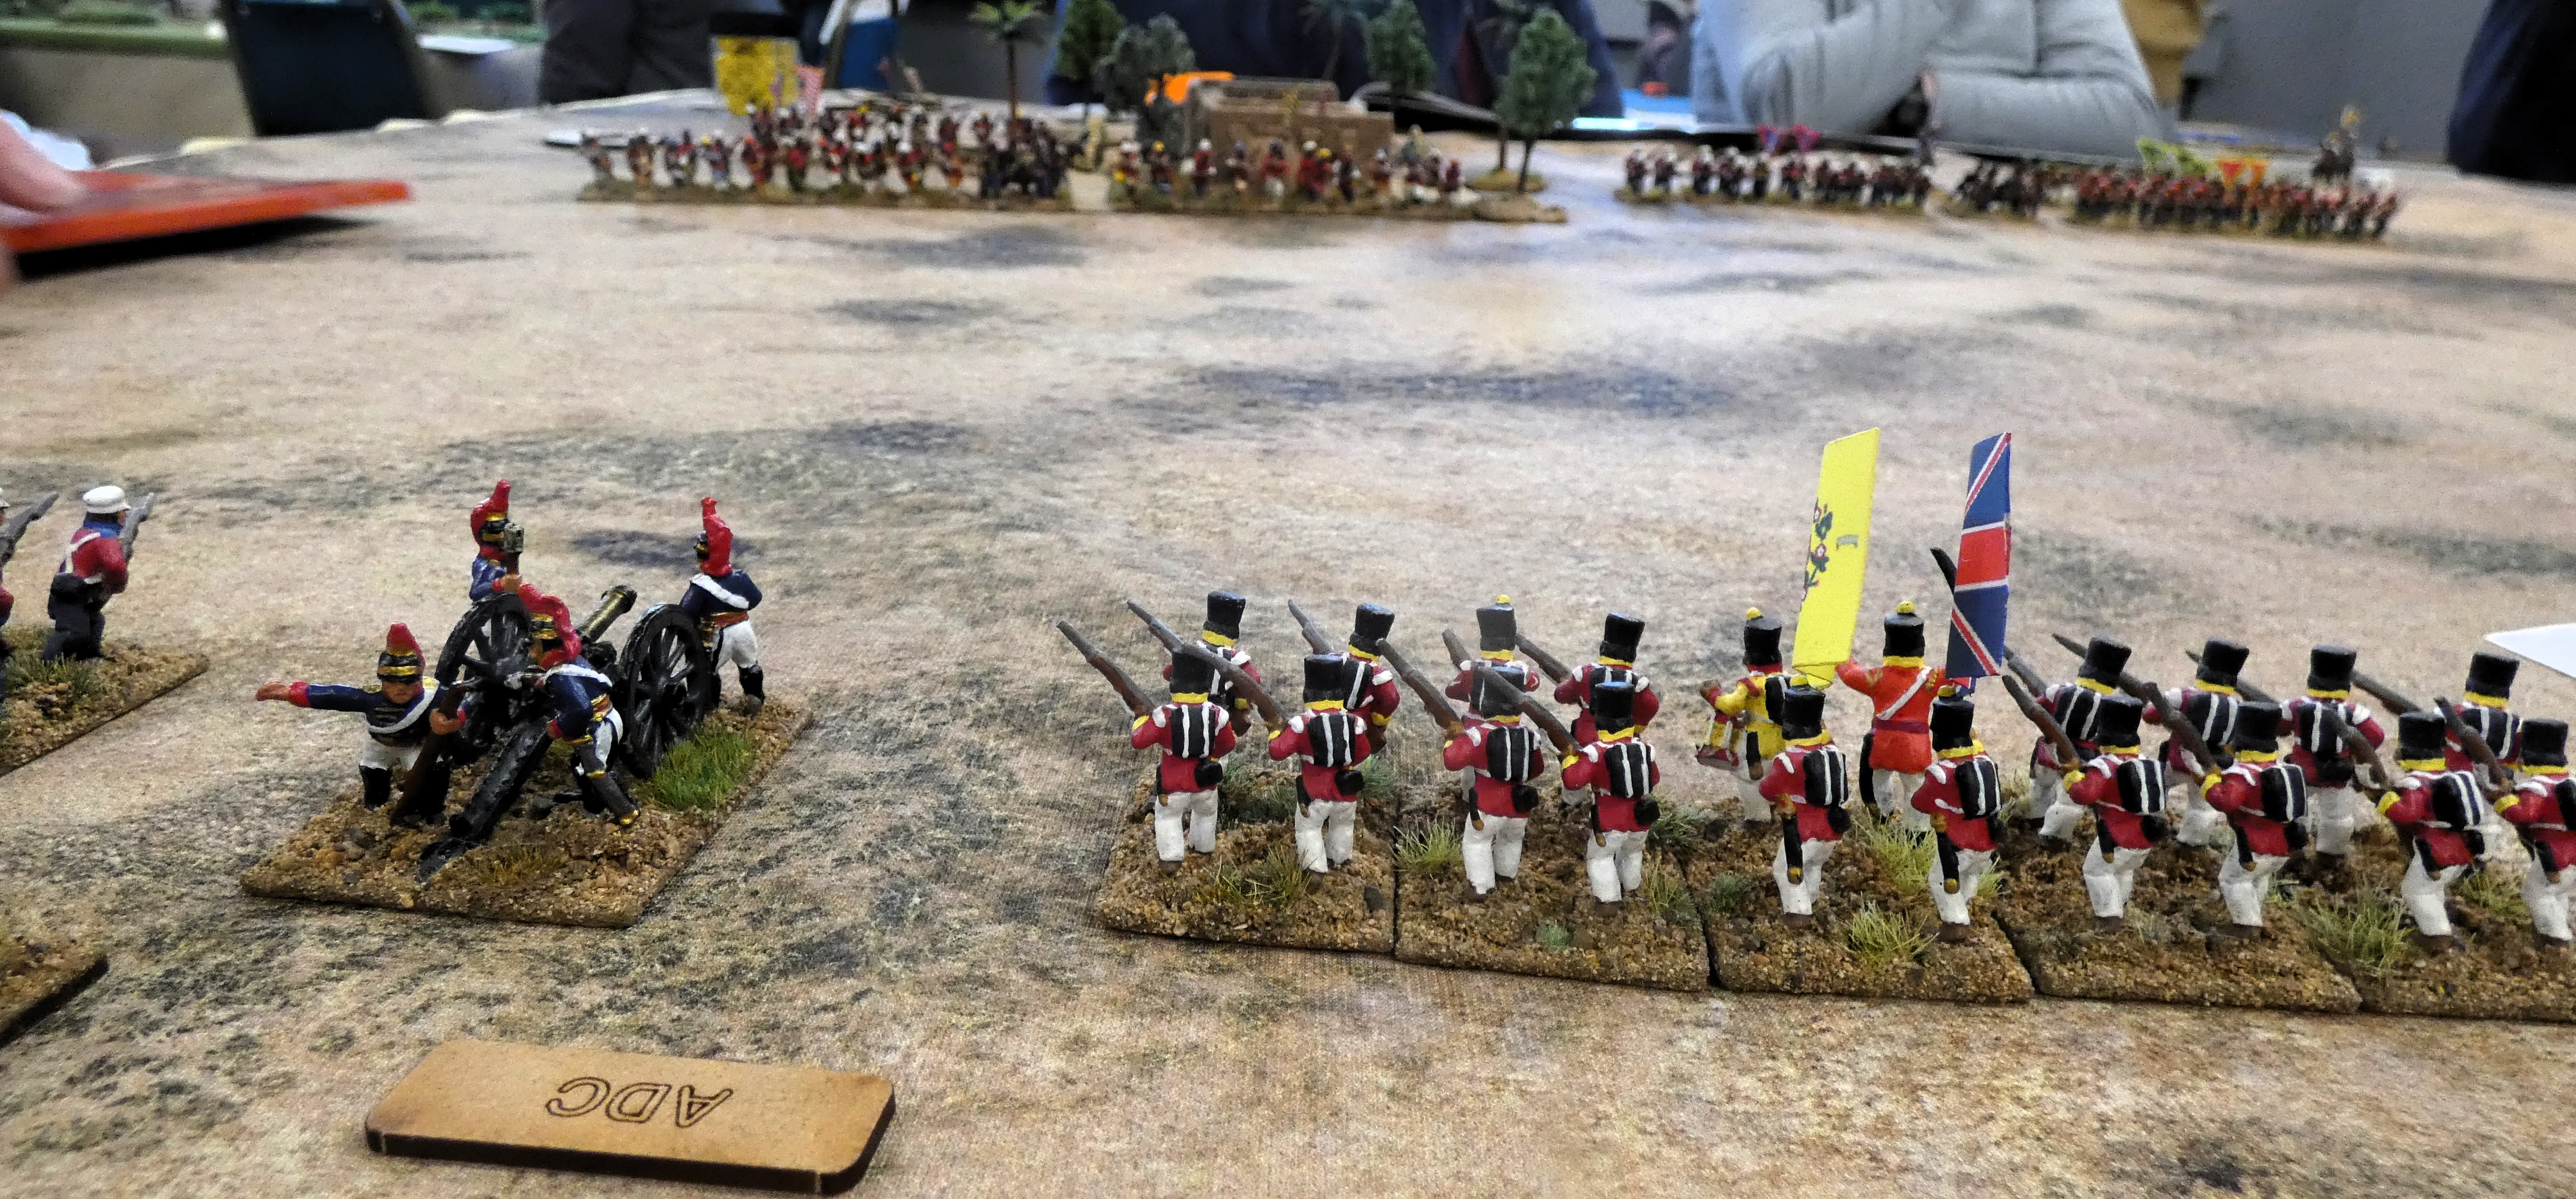
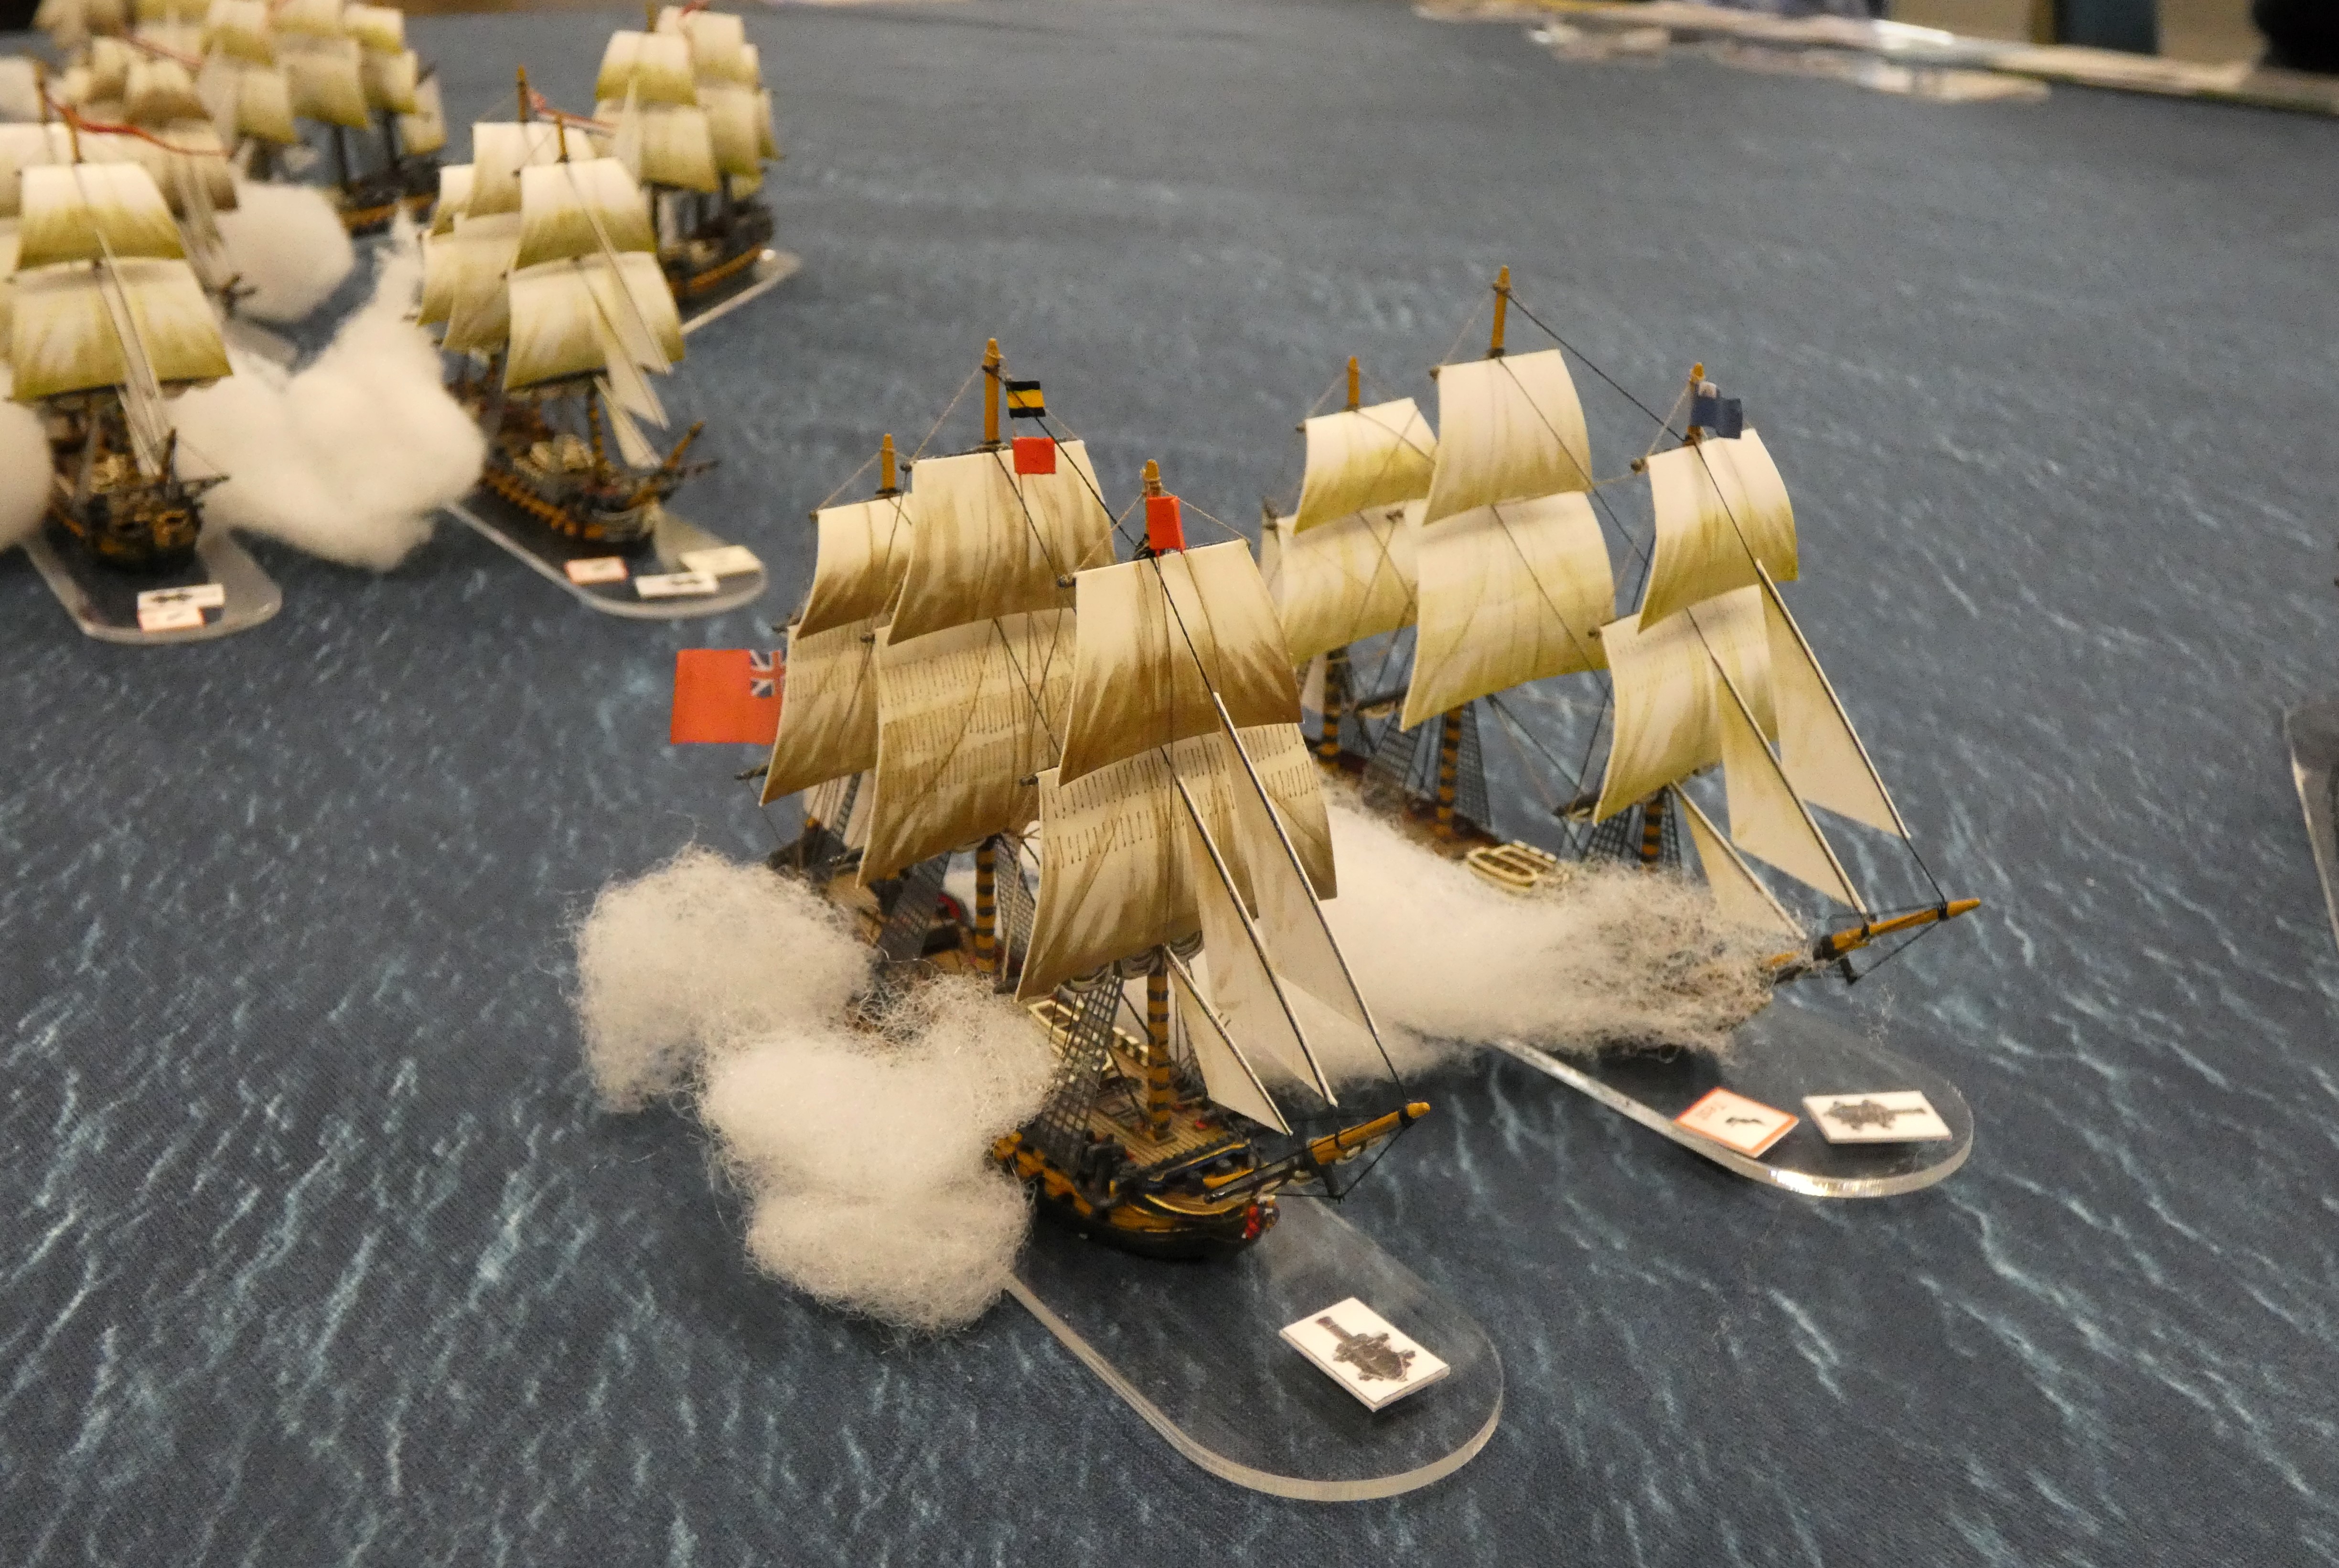
My chaps form up for the attack with my brigade deployed two-up (British line and a Sepoy battalion) and one back (sepoy battalion) and with artillery in the centre preparing the ground ahead. Note the ADC in attendance to make sure the advance gets going on time.
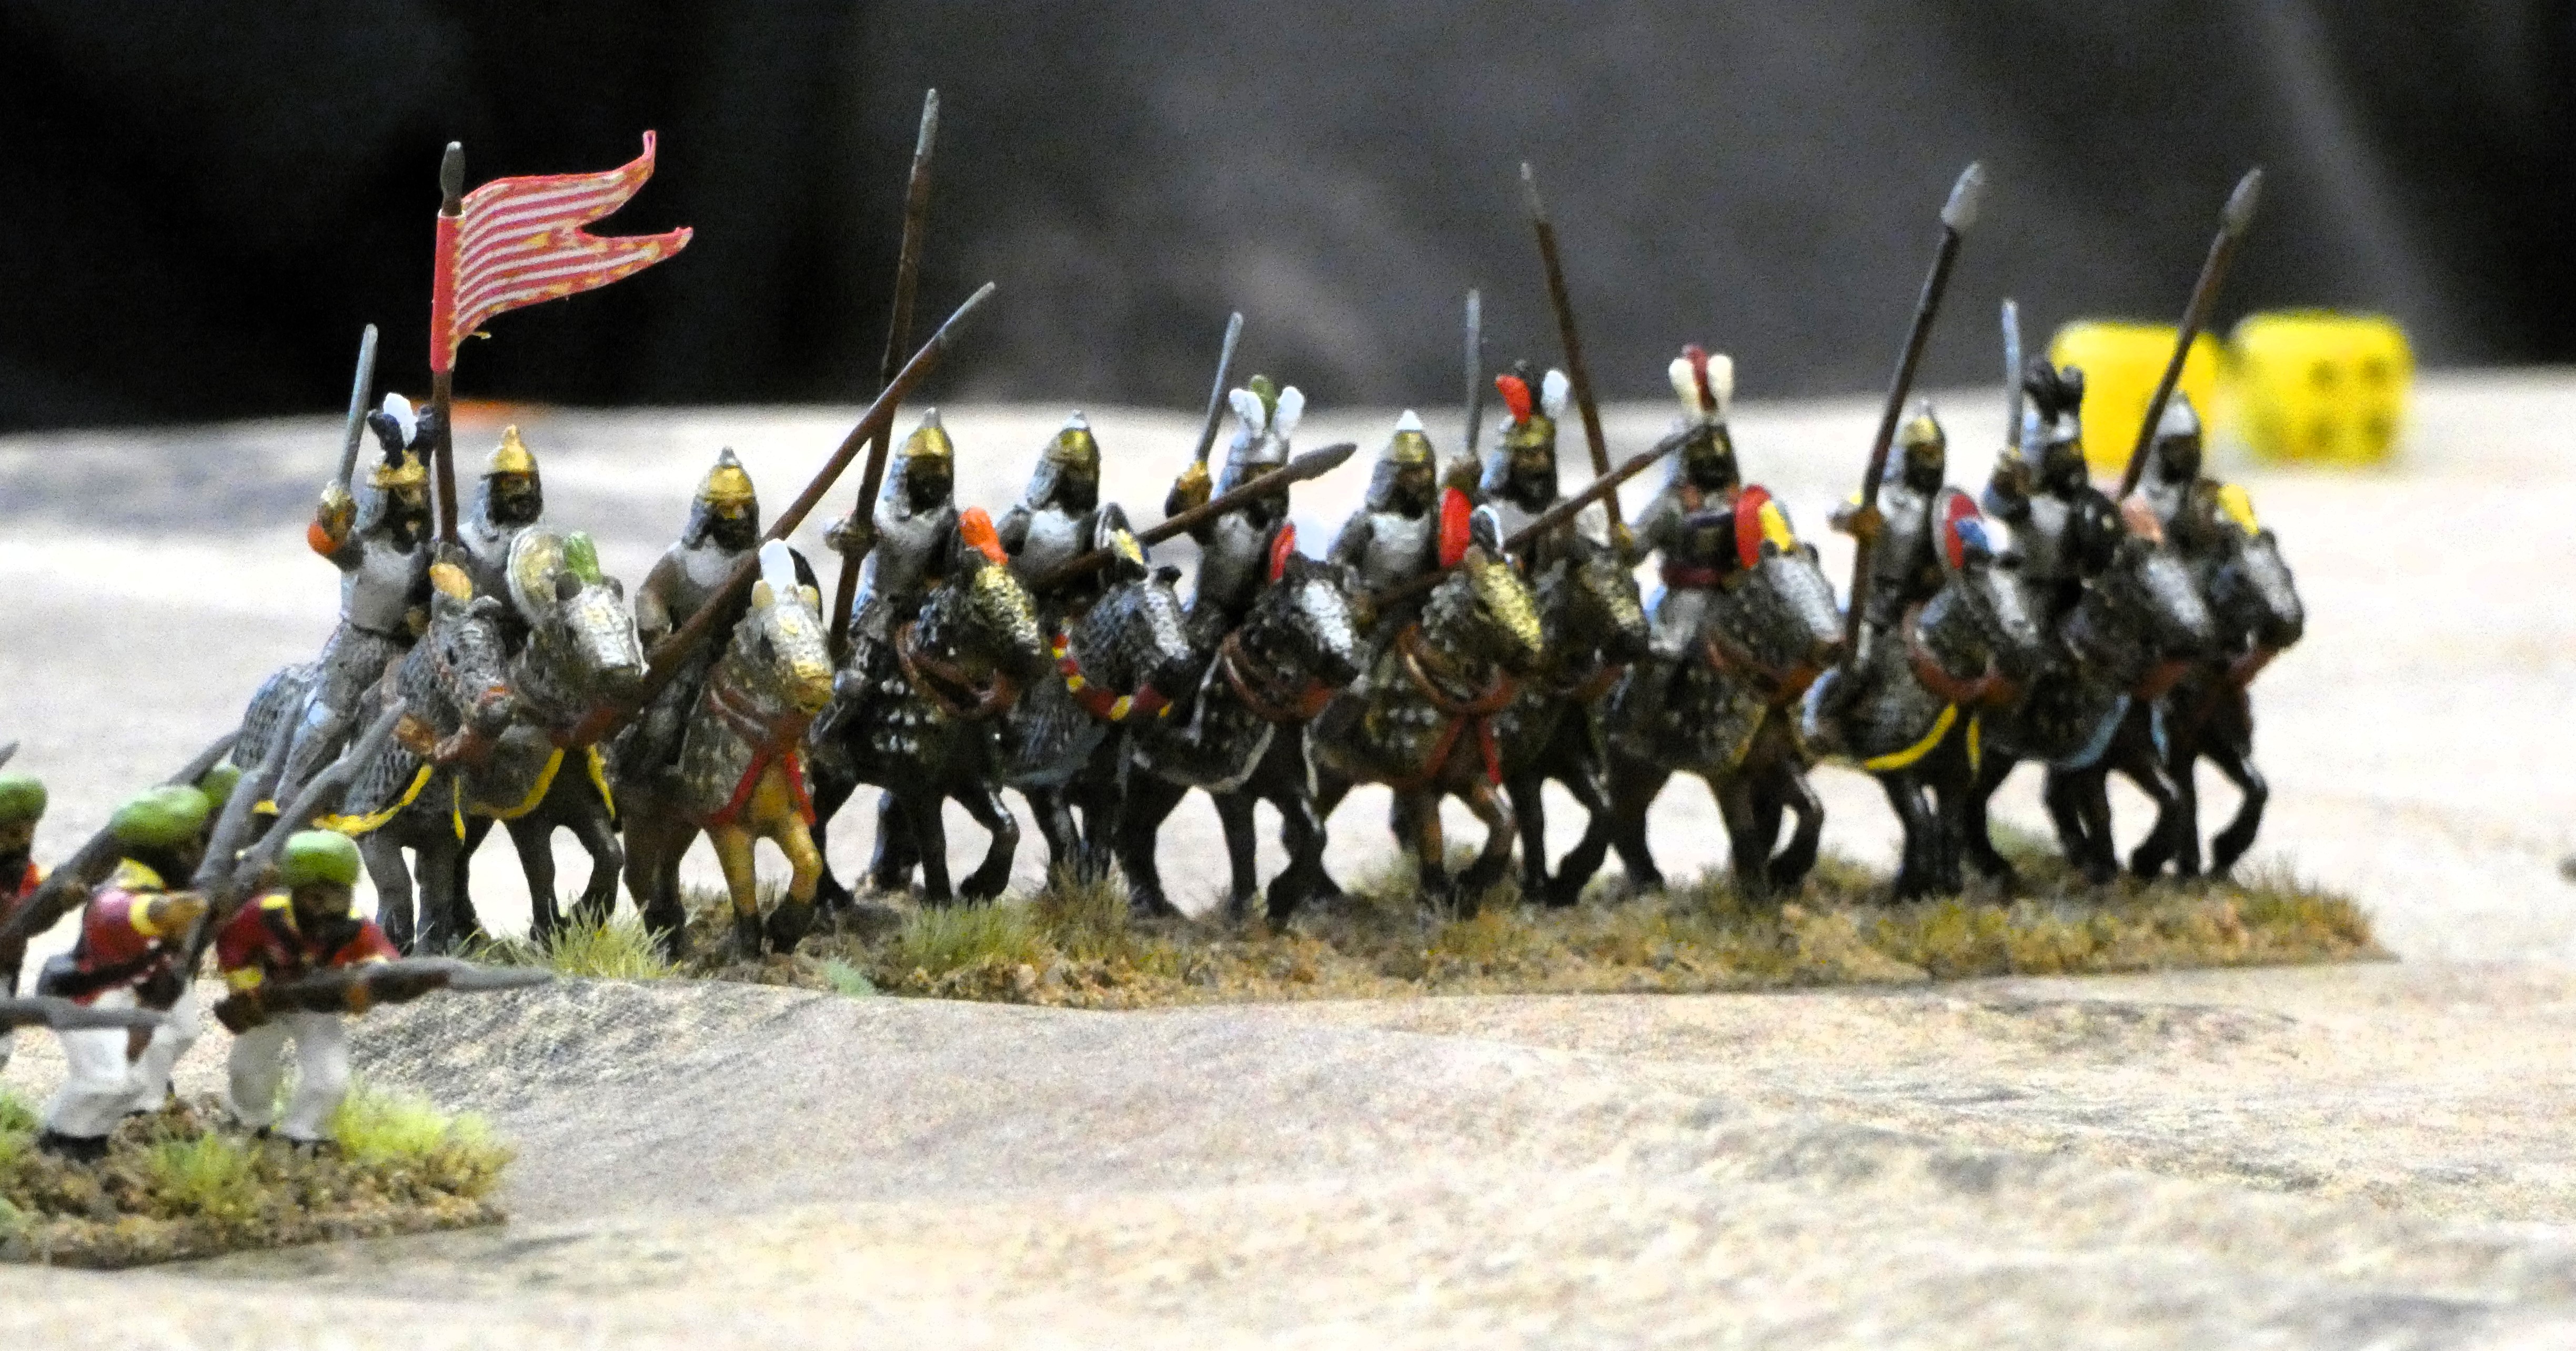
My determined opponents ready to repel the British and Sepoy attack
Our brave Brits and their Sepoy comrades boldly advanced with infantry on the left flank and centre supported by cavalry on the British right flank, mirrored by the Sikh army, anchored on the village.
The British pushed forward on the two flanks managing to draw Sikh infantry from the centre in support of their troops around the village, before the British reserves came up in the centre to make a hard push there instead.
Unfortunately for the British left flank the Sikh guns proved particularly effective and the attacking infantry was very shot-up before arriving before the enemy infantry positions and despite driving off one of the Sikh infantry units and battering their guns, were themselves driven back in disorder and dispersal having failed to make any impression on the defence.
Similarly on the British right, the calvary had some early success, seeing the light dragoons defeat the first Sikh heavy cavalry regiment as it charged in, but then succumbing to the follow up counter-attack by the second regiment and causing the brigade to fall back.
As the British reserves pushed up to support an attack by the centre, the Sikh reserve moved on to reinforce the centre as the two British flank forces retired, leaving the British commander little choice but to forgo pressing the attack in the centre and calling it a day.
GDA 2 plays very straightforwardly with a entertaining play sequence of initiative determination, decision points on use of ADC's and the usual exchanges of combat dice rolls for shooting and melee that you would expect from rules produced by Dave Brown and are a good choice for a game at club with a few brigades on each side.
I would need to play them a few more times to comment on the more nuanced way of playing them, and we omitted the use of skirmishers which I would very much want to see in play in a horse and musket action, as they are very much part of any attacking force's 'softening up' tactic along with support from artillery before the attack force moves into contact.
Thank you to Mr Steve for a fun walk through of GDA 2 with something a bit different from the usual Napoleonic setting, all too familiar at club, and to Nathan, Ian, Ian Mc., Steve L. and Bob for making our game.
I thought of Libya and the Western Egyptian desert as part of the Second World War, I never knew The
First World War spread there too. I soon discovered a history full of cracking-yarns, daring-do and
larger than life characters; the bread and butter of wargames scenarios!
Baron Max von Oppenheim. Wealthy, gifted-orientalist, archaeologist, adventurer and The Kaiser’s expert on all things Islamic and Arabic.
The Sanusiya
Muhammad al-Sanusi (or Sanussi or Sennusi), was born near Fez in 1787; he studied in Cairo and then Mecca where he became a Sufis. In Mecca his charismatic character drew him followers, upsetting the establishment. Leaving Mecca, he eventually settled in Jaghbub, an out of the way oasis settlement in eastern Cyrenaica close to the Egyptian border; the Ottoman provinces of Cyrenaica and Tripolitania make up Libya. There he started to proselytise and undertake charitable works amongst the nomadic Bedouin.
The Sanusi Brotherhood was uncomplicated, those who could read (ikhwan) recited The Koran and lead prayers. The teachings were orthodox Sunni and the Sufism was sober not ecstatic. Stimulating substances, including tobacco, were forbidden but work was encouraged. The Brotherhood built lodges (zawiyas) at the various towns and oases along the Sahara trade routes. These lodges were not just religious centres, they were staging posts for caravans, hostels for travellers, post offices and centres of agricultural improvement. Muhammad al-Sanusi was soon known as “The Grand Sanusi”.
When Muhammad al-Sanusi died in 1860, his eldest son al-Mahdi (not to be confused with The Mahdi) became The Grand Sanusi; al-Mahdi had administrative talent. Using the trans-Sahara caravan routes, the Sanusi Brotherhood became the largest and most wide spread religious organisation in North Africa. Their network of lodges stretched from The Red Sea to Senegal. Despite this expansion, the brotherhood stuck to bringing religion and better living conditions to the desert nomads; they did not seek political power.
The Grand Sanusi, Sayyid Ahmad al-Sharif al-Sanusi
At the death of al-Mahdi in 1902 his eldest son Idris, was considered too young to become The Grand Sanusi and so the title passed to Idris’s cousin, Ahmad al-Sharif. Times were changing and the Sanusiya clashed with expanding French and British imperial ambitions. An intermittent war broke out between the French and the Sanusiya in the Sahel from 1901; from now on the Sanusiya would become more political.
Egypt
Both Libya and Egypt were part of the Ottoman Empire and Egypt had its own rulers, The Khediv. Following The Mahdist Wars, Britain assumed de facto control over Egypt despite it being part of the Ottoman Empire, the Suez Canal was just too vital. The British kept an army of 30,000 men in Egypt, controlled the police, administration etc; all sections of Egyptian society smarted at this. To safeguard Egypt’s borders The Egyptian Coastguard was set up. The coastguard had two divisions, one for the seaward borders and one for the landward borders. The officers were a mixture of Egyptians and British and it was the landward coastguards who had contact with the Sanusi. From time-to-time a coastguard officer was invited to visit The Grand Sanusi but only Egyptian ones.
The Turkish-Italian War 1911-13
Italy invaded Ottoman Libya with all the paraphilia of early twentieth century warfare. The Grand Sanusi and the Bedouins rallied to the Turks and the Italians failed to consolidate their hold. The King of Italy instigated action in the Balkans, and the Turks, unable to fight both wars, ceded Libya to the Italians.
Mustafa Kemal (aka Ataturk, the founder of modern Turkey) in Libya during the Italian-Turkish War. Ikhwan wearing their characteristic white robes. Many Ottoman officers travelled to Libya via Egypt in thin disguise aided by a lot of “blind-eye” turning.
The peace treaty required the withdrawal of Ottoman troops but they left a hard core of men behind. The Grand Sanusi soon had a regular force of 5,000 Turkish trained men (muhafizia), the ikhwan were drilled, modern rifles and maxim guns were either smuggled-in or captured and obsolete artillery came out of hiding.
A British officer was now invited to meet The Grand Sanusi; he requested that the imprecise Libya/Egypt border be formalised, so Jaghbub was in Egypt. But there were larger considerations in London; Italy was not in the Triple Alliance and leaned towards Germany.
Muhafizia and the Sanusi flag on the march.
Ikhwan on the march, a Turk can be clearly seen in this picture to.
1914/5
The Entente imperial powers all had large Muslim populations. The German plan, devised by Baron Max von Oppenheim, was to instigate these populations to rebel, using the call to jihad by the Ottoman Sultan Mehmed V. Despite the expenditure of large amounts of money and effort, the German plan failed and the Baron’s star waned in Berlin.
El Dschihad - German propaganda material aimed at Arabic speakers.
For Egypt, a co-ordinated attack across Saini, a revolt in Egypt and a tribal invasion from the west would swamp the British. German agents brought promises and weapons to The Grand Sanusi; the Turks sent Colonel Ja’far al Askari, an Ottoman Arab, to command his forces. But The Grand Sanusi was still reluctant and it was difficult to win him over. When British officers visited bearing salaams and gifts (e.g. Kodak cameras) from Cairo, they were cordially received.
The outbreak of war in Europe and the Ottoman’s entry on the side of The Central Powers, failed to shift The Grand Sanusi because his gripe was with Italy. The Turkish attack from Sinai failed to capture the canal and the Egyptian population did not rise-up. The most deciding factor seems to have been Italy’s entry into the war, on the side of Entente powers, in 1915. The Turks persuaded their ally to cross into Western Egypt, where they seized Halfaya Pass and laid siege to the coastguard station and border town of Sollum.
Ja’far was born in Kirkuk, Iraq. Captured by the British, he embraced Arab Nationalism and commanded the army of Sharrif Hussain of Mecca. Subsequently, Ja’far was twice Prime Minister of Iraq and was assassinated in 1936.
HMS Tara
SS Hibernia was a ferry across the Irish sea. Requestioned as HMS Tara, she patrolled the coast from Alexandria to Sollum; for the crew it was a holiday cruise. On the 5th of November 1915, as the Tara approached Sollum, she encountered U 35 enroute to Bardia. A single torpedo sank the Tara, twenty crewmen were lost and U35 handed over the ninety-two survivors to the Turks. Two days later, a boat was sent from Sollum to search for the Tara and debris was soon found. When rumours reached Sollum of a German submarine towing lifeboats, the fate of the Tara was obvious.
The British demanded The Grand Sanusi release the Tara’s crew immediately but he was now between a rock and a hard place. A few days later U35, returning the same way, stopping to bombard Sollum with her deck gun. Cairo decided to evacuate Sollum; fortunately U35 had sailed away and a seaward evacuation was successful. Relations between the British and The Grand Senusi plummeted. (The rescue of the Tara’s crew is a cracking-yarn and will make a very good game).
The Western Frontier Force
The British were heavily engaged in the Middle East (Sanai, Mesopotamia and Gallipoli), and another front was unwelcome. Many in London said the war against Turkey was a side-show, the real war was in France. A campaign in Western Egypt would be a side-show to a side-show; thus “The Western Frontier Force” was born.
Map showing main area of operations, some of the spellings are different. The high ground inland behind Sollum is Halfaya Pass (aka Hell Fire Pass). The railway line to Al-Da’ba is shown too.
Abandoning part of Western Egypt, the British concentrated at al-Da’ba, the railhead from Alexandria. Beyond al-Da’ba the rest of the way to Sollum would be on foot along “The Khadival Road”; more a large track. Logistics were horse-drawn wagons and limbers, not out of place in the Zulu wars. No longer relying on locally recruited troops, men from all over the empire became involved. Australia and New Zealand, South Africa and India and Britain too. Apart from the Indians, the rest had join-up in 1914; trained and enthusiastic but lacking experience.
British Yeomanry
Today’s Game - Battle of Gebel Medwa
As the British marched westward the Turkish/Senussi used their local knowledge and twice sprang large scale ambushes but these failed to stop the British. On Christmas day (25th December) the deciding battle of the campaign was fought. The slow speed of the march had split the British column in two parts, so there were effectively two engagements on that day. The sum of which showed The Grand Senussi that he would not defeat the world’s largest empire; there after the campaign developed a different tempo.
Sikhs guarding prisoners
Today’s game is one of these two engagements at Jebel (mount)) Medwa. The jebel is lightly held by Ja’ far Pasha’s forces as his main force is still encamped. The British knowing this, thanks to aerial reconnaissance, decides to carry the jebel with infantry while the mounted Yeomanry make a sweeping outflanking movement, before both forces attack the Senusi camp. But the Yeomen were delayed by the terrain and, not knowing this, the infantry assault went in.
Ja’far rushed troops to the jebel and what followed was a classic infantry assault on a position. Without the Yeomanry in position, much of the Senussi force manged to escape, but their morale was now low and many tribal troops melted away. Before and after the battle it rained, so the British did not have the advantage of vehicles as the desert surface was turning into sticky clay but aircraft could still operate from the beach.
Rule Set
We used “A Fist Full of Lead – Bigger Battles” by Jaye Willey for this game. They are uncomplicated
while giving a good feel for these types of engagement; more large skirmishes that pitched battles.
In these rules each unit gets dealt a card for activation, but to better represent the command structure the unit commanders are dealt two cards. So long as subordinate units are within six inches of each other and their commander, all the commander and his units can both make actions.
British order of battle - all British units count as regular.
Commander – Maj-Gen Wallace
HMS Clematis - 2 x 4” guns (off table)
Overall Infantry Commander – Lt-Col Gordon
Sikh Infantry Leader – Maj Pennefather
4 Companies of 10 Elite infantry and 2 MMG Sections
New Zealand Infantry Leader – Maj Austin
4 Companies of 10 Regular Infantry and 2 MMG Sections
Middlesex Infantry Leader – Lt-Col Dams
4 Companies of 10 Average Infantry and 2 MMG Sections
Yeomanry Cavalry (can dismount)
Capt Guy Cheape and 1 Sqdn. of 10 Cavalry with rifles and swords
Nottinghamshire RHA - Lt Hopkirk and 2 13-pdr guns medium guns
Australian Service Corp - Maj Francis and 2 Companies of 10 Infantry
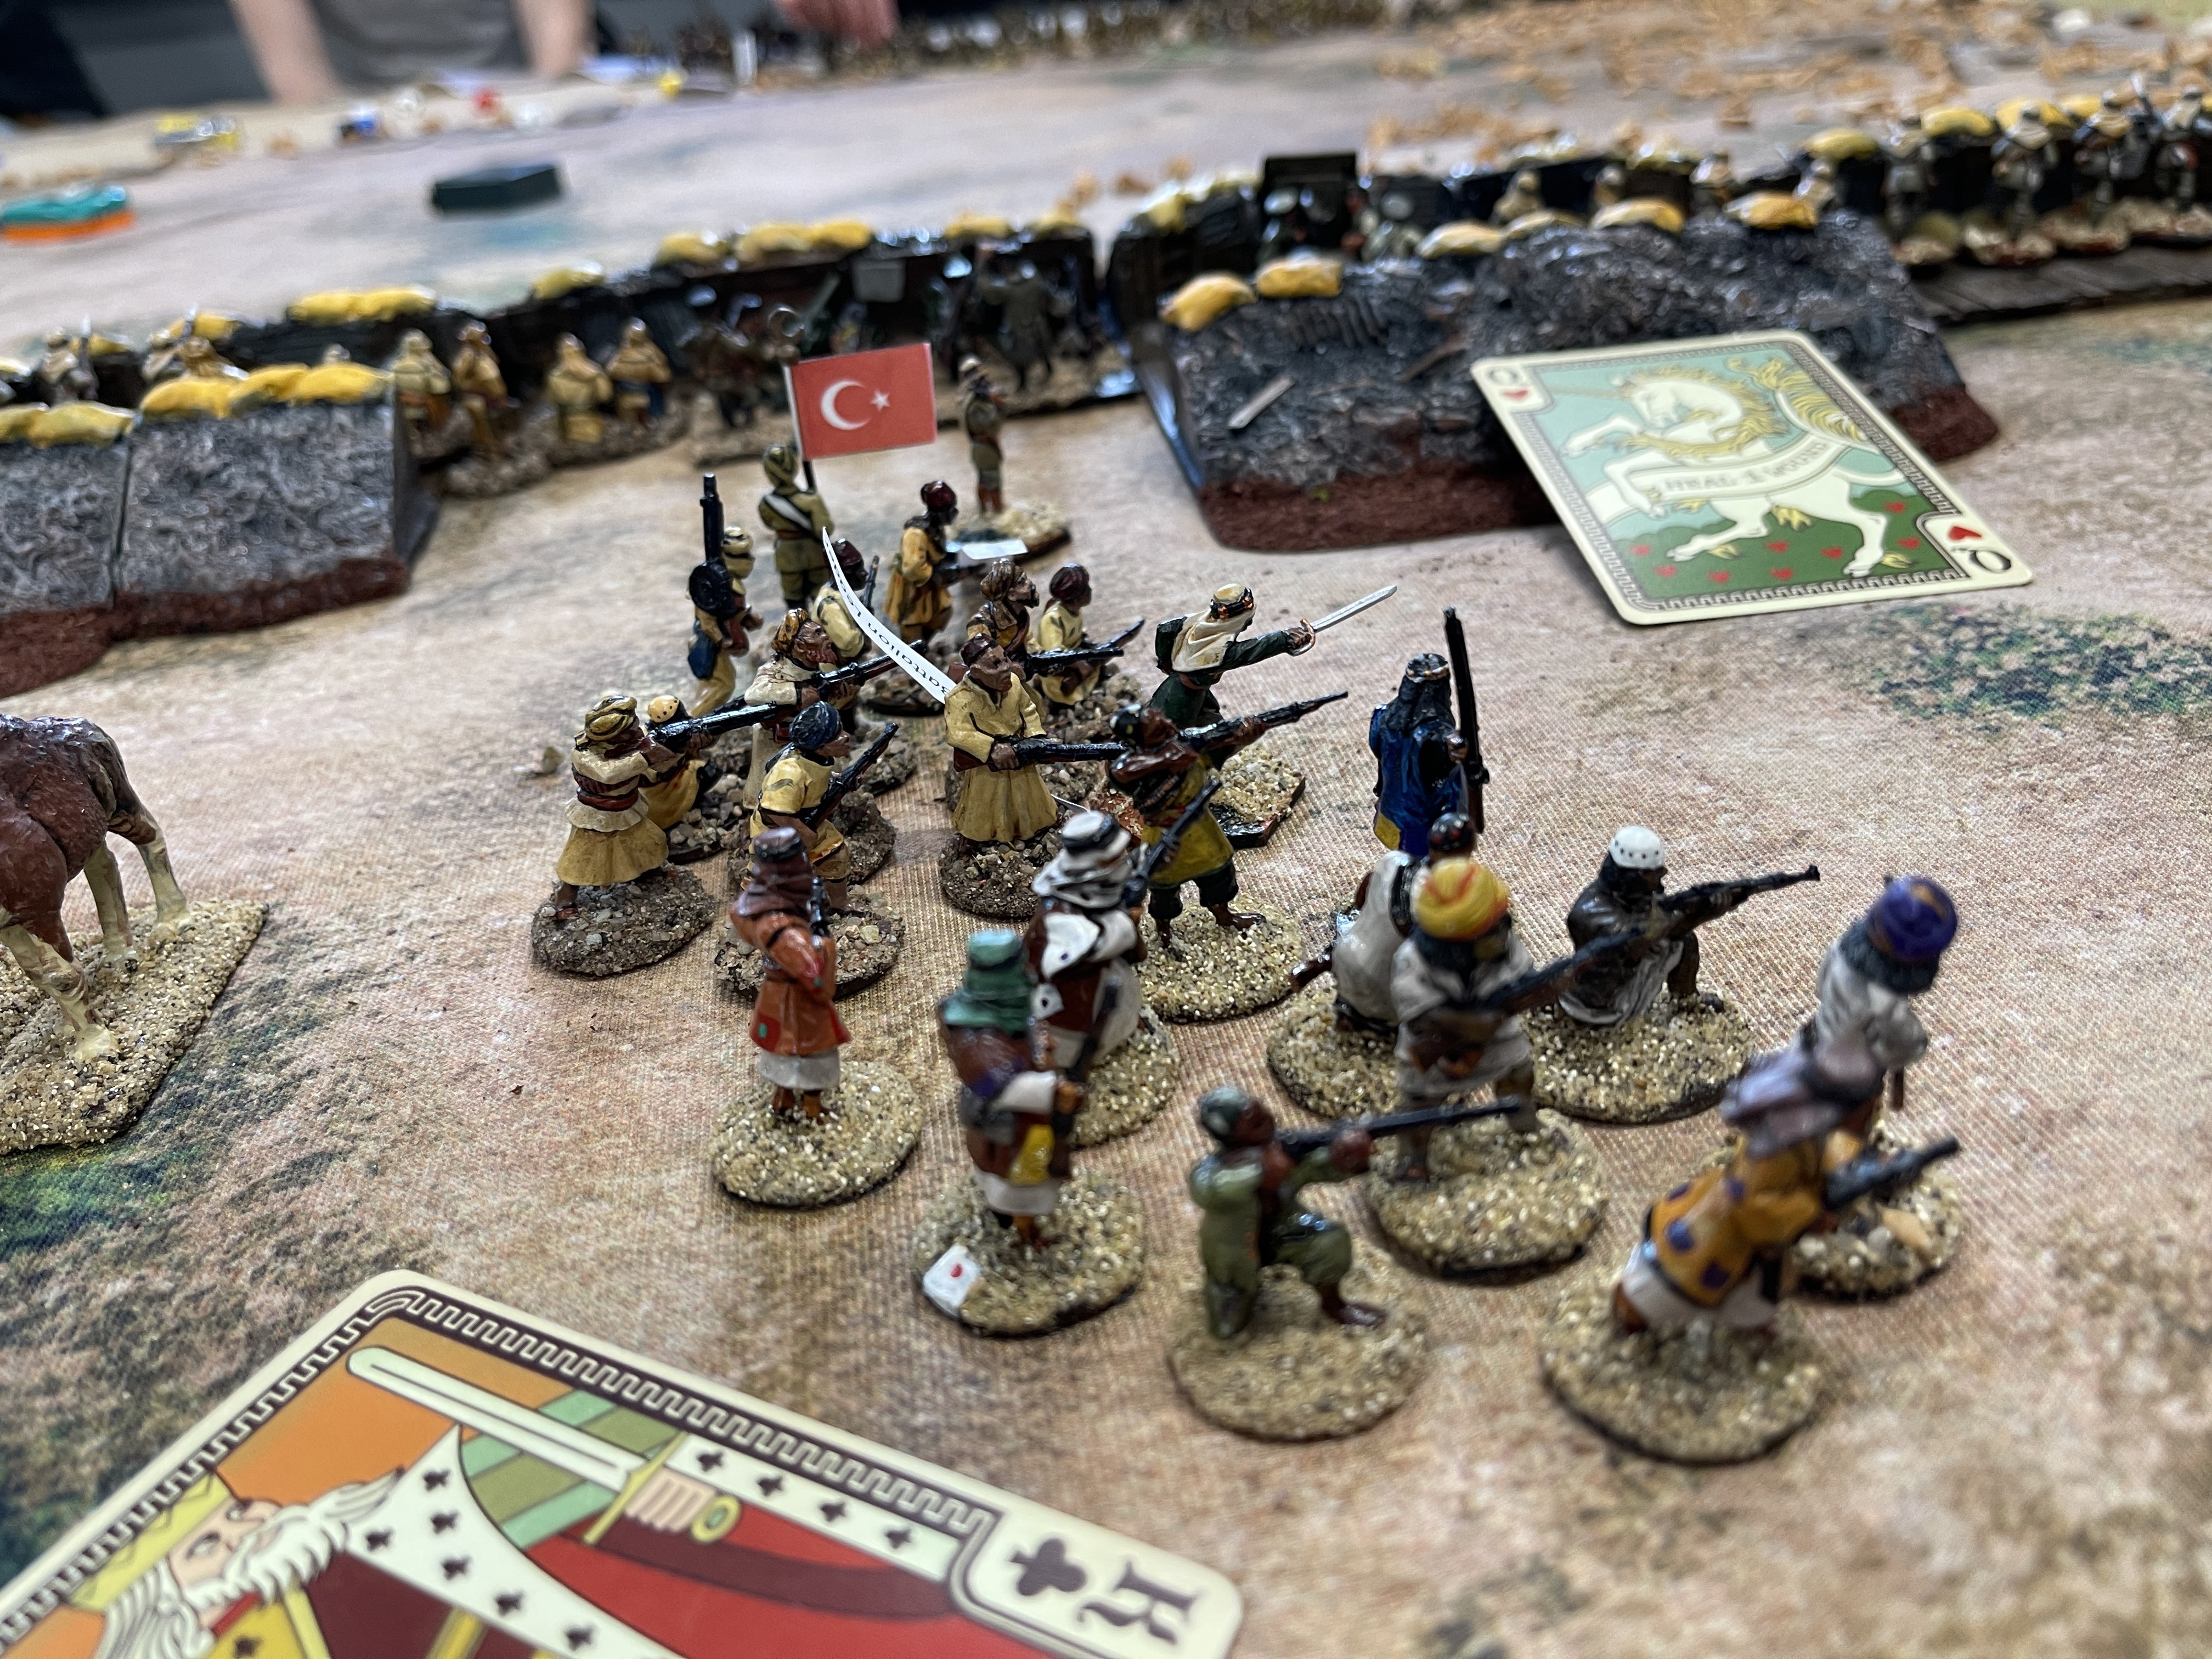
Turkish and allies order of battle, a mixture of regular, irregular and tribal troops.
Commander – Col. Ja’far al-Askari Pasha
Artillery commander and 4 Krupp Light mountain guns (obsolete) Regular
2 Muhafizia Battalion Commanders with 3 Companies of 10 per Battalion, Regular Infantry
6 Turkish MMG’s Regular
2 Sanusi Ikhwan Battalion Leaders with 3 Companies of 10 per Battalion, Irregular Infantry
1 Sanusi Tribal Infantry Leader with 2 Warbands of 12 figures, Tribal, obsolete rifles
1 Bedouin Tribal Infantry Leader with 2 Warbands of 12 figures, Tribal, obsolete rifles and swords
1 Bedouin Tribal Cavalry Leader with 2 Warbands of 12 figures, Tribal obsolete rifles and swords
How The Game Played
The Imperial troops were all deployed along the Khedival road marching in the direction of Sollum, while up to half the Turkish/Senusi forces were deployed on the table at the beginning of the game.
The round of cards saw the Imperial troops shake out of marching order and unlimber their artillery. The off table indirect fire from HMS Clematis got off to a good start with two hits on the Turkish defence line, but the hits were not converted to any losses. The Turkish defences were already manned by their best troops, the Muhafizia and supported by maxim guns and obsolete artillery. As their first move, the Turks started to bring on as many of their second line irregulars and tribal troops as there was space to deploy, securing their western flank; clearly the Turks were going to make a fight for the high ground.
The cards were dealt for the second move and the Imperial troops fired their artillery again, both HMS Clematis and the 13-pdrs, causing some minor casualties to the enemy artillery. The Imperial infantry continued to shake out and take up their assault positions. The Turks advanced their tribal cavalry forward to discourage further westward advance by the Imperial troops and making space to deploy the remainder of their forces.
A third round of cards was dealt and the Imperial troops were now advancing towards the Turkish lines, but accurate maxim gun fire from the Turks caused casualties amongst the Sikh troop, who were the best Imperial troops. The Beaudoin cavalry continued to demonstrate against the Yeomanry at the head of the march column.
The fourth round of cards went in the Turks favour and they used them to lay down heavy fire on the Sikhs causing more casualties before the Sikhs could react. The New Zealand brigade received its first casualty in this move to, as they pressed forward. The Imperial artillery plugged away causing some casualties and shock to the Turks. So far both sides had been able to shake off most of their shock by using their officers, especially the Imperial forces who had an extra officer.
By the time the fifth round of cards was dealt, players were getting a better handle on the subtilties of the cards. Not only do the cards determine the sequence of play, but they confer attributes to the activated unit (e.g. remove all shock, or recover one casualty back to the unit); there was much more deliberation on which card to play and where to play it from now on.
The Sikhs had deployed their supporting machine guns but were unable to get any hits on the dug in Turks. The Yeomanry dismounted to take up rifle firing positions as their weapons outranged those of the Bedouins. If the Yeomanry advanced next move they would be in range of the Bedouins and the Bedouins could fire back. By know the Imperial tactics were becoming clear to the Turks as their enemy was pressing hard against the eastern end of their entrenched firing line. The Australian Service Corp had climbed the high ground and were threatening to outflank the Turkish defences, from where their targets would no longer be in cover. Seeing this the Turks were moving troops to reinforce this threatened flank.
The sixth round of cards saw a lot of study and decision making on both sides as they tried to balance the desire to go first with the need to maximise the attributes of the lower ranked cards. The Sikh’s machine guns lost the exchange with the better dug in Turkish ones and were silenced, not wishing to incur further casualties the Sikhs were withdrawn out of maxim gun range. The Bedouin cavalry fearing the Yeomanry rifles, fell back too. The Imperial artillery plugged away causing shock and casualties as the remaining infantry pressed forward, the muhafizia and maxim guns making them pay for every yard forward.
The seventh round of cards saw the Australian Service Corp outflanking the Turkish firing line, accurate rifle fire drove off some Turkish maxim guns on eastern flank, the objective of the Imperial assault. The Sikhs spread out to create a defensive perimeter on the western and central part of the British line, freeing up other Imperial elements to join the main assault.
The eighth deal saw more accurate musketry by the Service Corp and some flank covering Ikhwan were driven off too. By now the infantry of both sides were well within rifle range and the firing became hot and deadly. The officers of both sides found themselves busy rallying and urging their men. Several Imperial officers had close shaves and Ja’far Pasha was seen encouraging the retiring maxim gunners with a lash; it was all-in now as both sides concentrated their forces on the eastern flank. The Imperial infantry obliqued and widened their frontage to maximise their rifle fire. The Yeomanry remounted and rode to the sound of the guns as the Sikhs stalwartly held the rest of the line. The defenders rapidly moved more units to the centre of the action.
The ninth and final round of cards favoured the Imperial troops greatly as the cards fell in their favour. But despite a good start the Turkish rifle and maxim gun fire was unforgiving. Realising that they were unlikely to carry the position the New Zealand and Middlesex troops were ordered to fall back.
As far as the infantry was concerned, they had more than done their job, pinning down the enemy force for the out-flanking Yeomen to carry the now poorly guarded enemy camp. We can only imagine the comments from the infantrymen, tucking into their Christmas bully-beef, when they heard that the Yeomanry manoeuvre was unsuccessful and the enemy had largely escaped. But their reaction was nothing compared to the lashing Ja’far Pasha gave his batman; in his haste to evacuate the camp, the batman thought it fit to abandon the Pasha’s personal effects and comforts.
Carrying an uphill dug in position was never going to be easy for the Imperial troops. In reality, the Imperial forces immediately concentrated all their infantry, led by the Sikhs, and artillery against the eastern flank of the Turkish line, overwhelming it. None of the members of the DWG have thirty years military experience fighting in the Hindu Kush, so they should be forgiven for this oversight. With hindsight, I should probably have designated the Turkish entrenchments as light cover, not hard, as they were not of the sophistication found elsewhere.
Post Script
At the outbreak of hostilities Idris al Sanusi was returning from Mecca. Idris arrived in Cairo and remained there for the duration of the hostilities, penning letters to the British protesting his friendship and how his cousin had been mis-lead by cunning men.
Britain’s secret weapon was the internal combustion engine. Armoured cars, trucks and aeroplanes were progressively introduced to the western desert. What would take the Sanusi several days to travel, the British could cover in a few hours. Reconnaissance flights located and monitored the movement of the Sanusi forces and camps. Motorised troops could travel into the desert and attack by surprise.
In 1917 a peace treaty was signed between The Grand Sanusi and the British. One of the stipulations was that Ahmad resign as Grand Sanusi and be replaced by Idris. The British and Italians later recognised Idris as The Emir of Cyrenaica. During the Second World War the Senusi leaned towards the British and in 1948 Idris became King of Libya, until he was overthrown by Colonel Gaddafi in 1969.
Gaddafi’s regime had little time for the Sanusi brotherhood, but after the fall of Gaddafi the Sanusiya have become more prominent in Libya’s affairs. The current Crown Prince of Libya is Mohamad El- Sennusi.
Max von Oppenheim went on to excavate Tel Halaf in north Syria, which he first saw in 1899 and it made him world-famous. This is an interesting German documentary on the Baron’s diplomatic and archaeological career, it touching on T.E. Lawrence too.
T.E. Lawrence played a tiny role in this campaign; after Sollum was recaptured he delivered new signal cypher codes there. As part of the British Intelligence Service in Cairo however, Lawrence had a ring side seat to events and these clearly influenced his thinking and later actions.
Sources
The Sanusi’s Little War by R McGuirk
The Sanussi’s Little Miniature War 1915-17 by R Giglio
Miniatures are from a variety of sources: British Imperial are a mixture of Empress Miniatures, Wargames Atlantic et al. Turks, Sanusi and Bedouin come from Woodbine Miniatures, Wargames Foundry, Perry Miniatures et al.
Thank you to other DWG members who lent figures to make the game possible.
The players were John Roberts, Mark Crisp, Ian Mac, Mark Thomas, and Tom, not overlooking dice rollers Luke and Mathew. Thanks for making this far flung out of the way game such good fun or atmospheric as John Roberts likes to say.
The previous six months has seen me focussing on building the British and Batavian Dutch fleets that fought the Battle of Camperdown on the 11th October 1797 in 1:700th scale using the range of models from Warlord Games' Black Seas collection.
As well as documenting the progress of this project build on my personal blog 'JJ's Wargames' I have been keen to try out ideas for playing the battle with a new set of fleet rules, 'Far Distant Ships' (FDS) by David Manley whilst also preparing the option for using the tried and trusted Kiss Me, Hardy (KMH) rules where time permits to play a longer game.
You can follow the progress too-date with the project build and the recent play-test of FDS in the links above.
My original plan was to try out some other ideas with FDS at club, but with the number of folks wanting to play and keen to keep everyone involved, something my current collection using FDS would struggle to do, I opted to play the same scenario recreating the attack on the Batavian rear by the British Leeward Division, seen in the illustration and map below, using KMH to compare and contrast the games those rules will produce.
A primary document illustrating the developing British attack on the Batavian line at Camperdown, with our game focussing on the attack of the British leeward division as highlighted
The set up uses the ships identified in the plan below. leaving out the British fourth-rate Adamant, not really needed given the superiority of the British force, or any of the British light ships for that matter.
The plan illustrating the primary ships involved in this battle within a battle at about 12.30 on the 11th October 1797.
The table below illustrates the set up, with the Batavian rear, drawn up in line of battle to the left, with the 40-gun frigate Monnikkendam and the 16-gun brig Daphne acting as a second line and ordered to engage any attempts by the British to penetrate the battle-line.
On the opposite side are the British leeward division led by their flagship HMS Monarch 74-guns bearing down on the enemy line in line abreast (well sort of), not quite in 'Spithead Review' order given the necessity placed on them to close with the enemy quickly to prevent them from edging into the shallows beyond, that would better enable the more shallow drafted Dutchmen to escape battle.
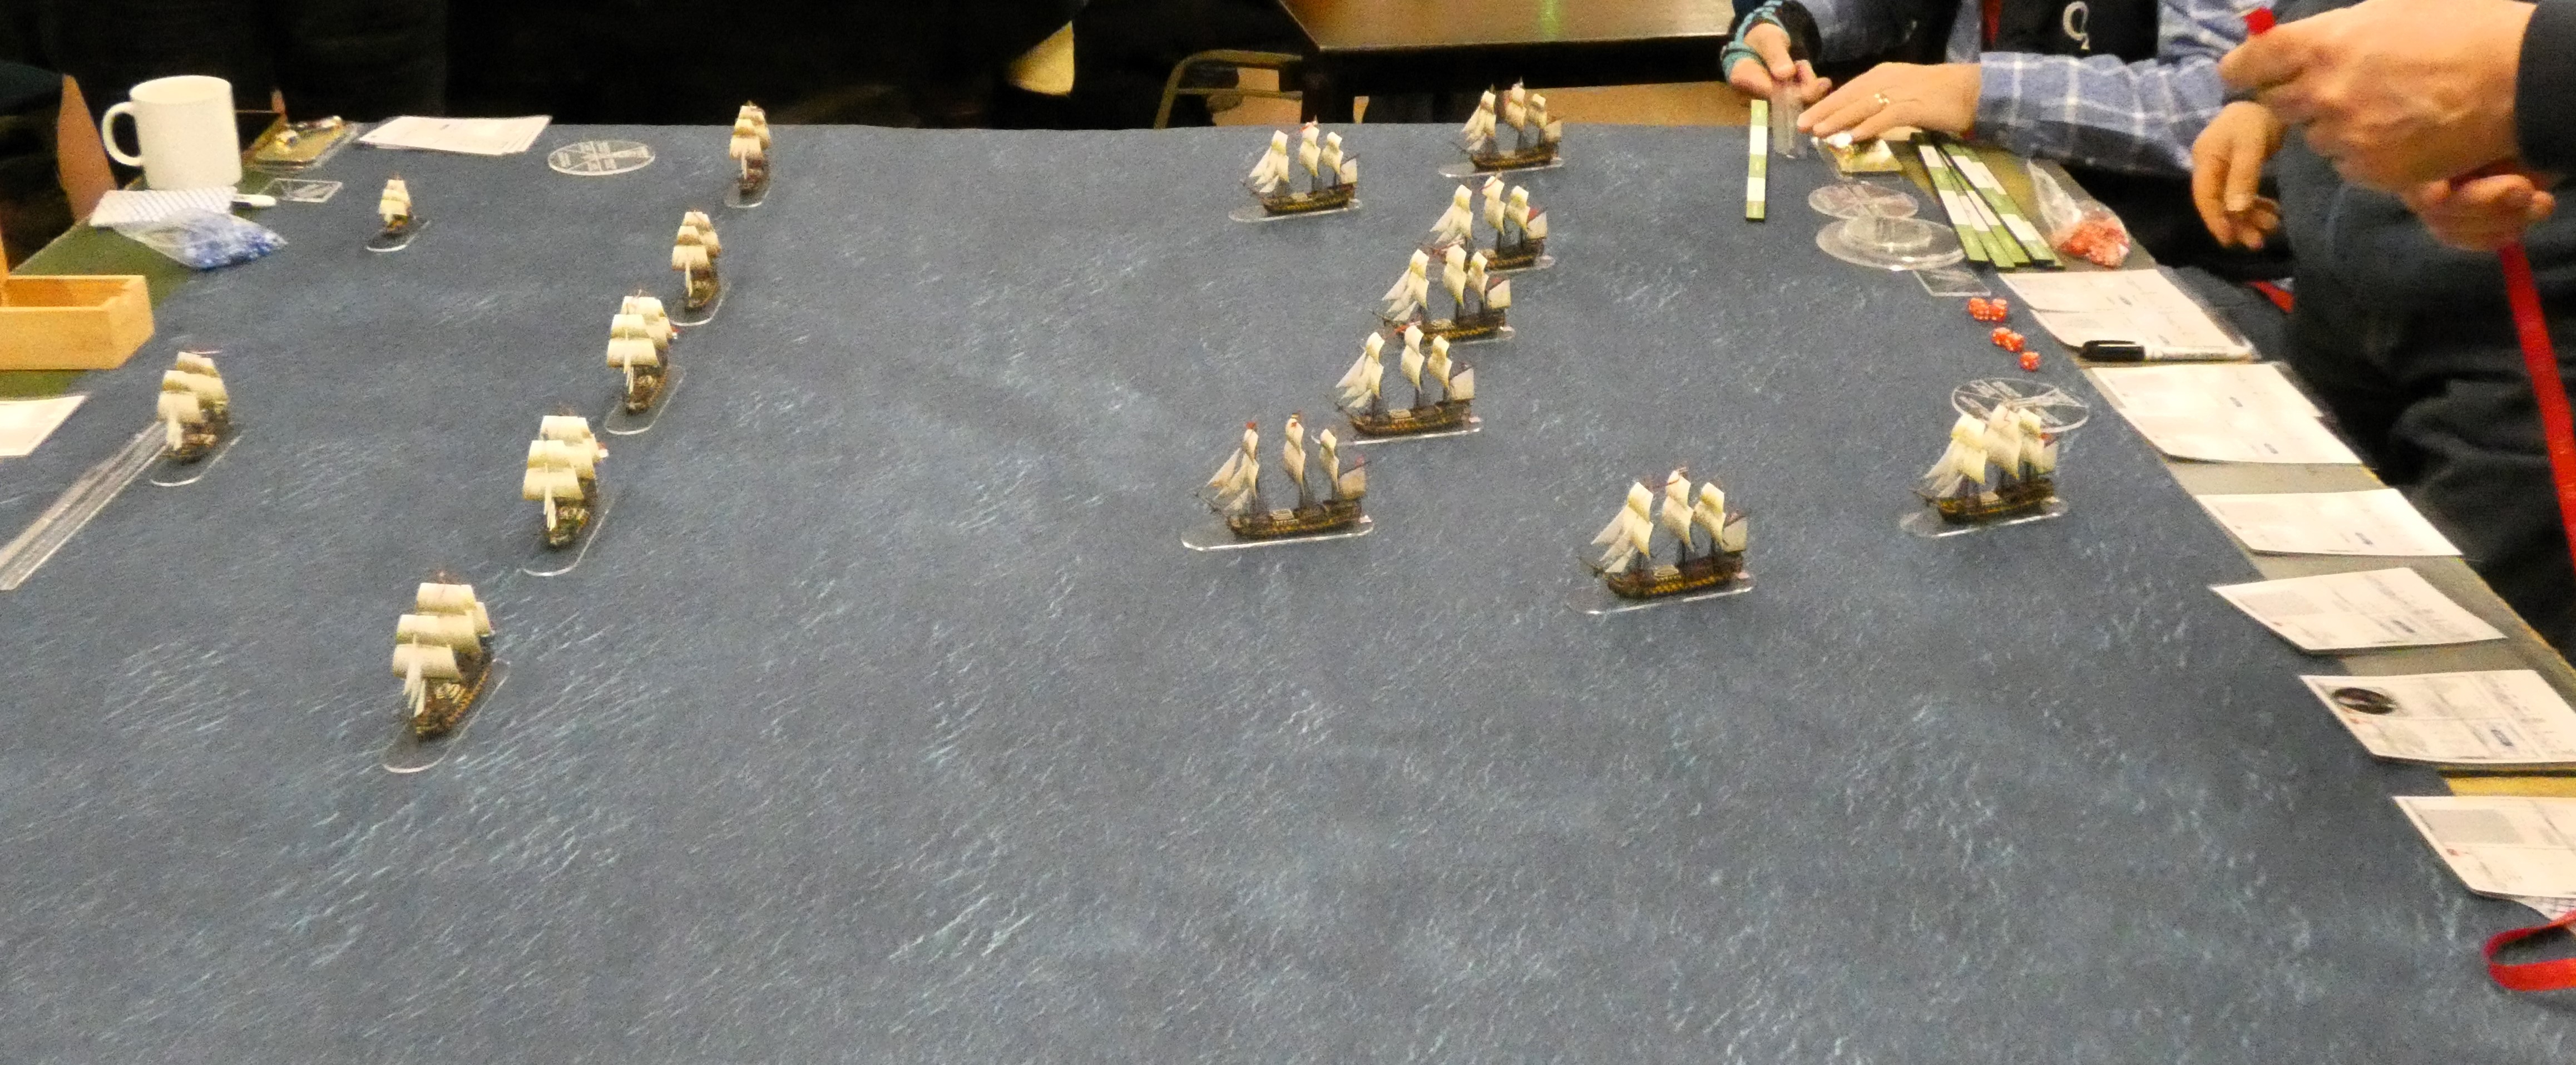
The plan and panorama brought to life on the table as the battle commences.
As in the previous game the Batavians were accorded the benefit of superior gunnery given the training they had indulged in whilst blockaded in their home port of the Texel, in this game fighting as 'San Culottes' under KMH to reflect their lesser sailing abilities compared to the British but with their gunnery upped by one class, thus for example seeing an Average Sans Culottes crew firing as an elite crew.
The view of the approaching British from the deck of the frigate Monnikendam, with closest to camera Cerberus 68-guns, with following the flagship Jupiter 74-guns, the Haarlem 68-guns and the Alkmaar 56-guns.
Similarly, to reflect the Batavian captains reports of having to close lower gun ports on the leeward side because of the effects of the wind, we had them test prior to firing their leeward guns for said effects with a simple die roll that would see ports closed on a score of 1, 2 or 3 and a partial broadside resulting.
The Batavian line maintains its heading and holds its fire as the British bear down.
For the British, we played a test to see if captains would obey the signal to pass through the enemy line to leeward with a D6 test, with ships failing on a 1 or 2, the Monarch on a 1, for which a failed test would see the affected ship turn away and engage their opponent on the windward side.
The infamous Captain John Williamson
In addition we had the 'battle-shy', Captain John Williamson, commanding HMS Agincourt 64-guns, modelled by having said ship turn away to windward once withing medium gunnery range, only able to come closer to any enemy vessel that had struck previously.
HMS Monarch opens the British account with a daring short range bow-chaser pop at the Batavian flag ship Jupiter
With a quartering wind the British barrelled along, to come within short range in about three turns of play, with the Batavians holding their fire, not able to take advantage of the normal Sans Culottes advantages of firing at the rigging, as this was not in their doctrine, with all the added bonuses better suited to firing into British hulls instead.
It was not long in coming, as the Jupiter acknowledged the British salute with one of her own
With some contempt, the two British 74's, Monarch, and Powerful closed to short range with their bows pointing at Batavian broadsides yet to open fire, gambling that the next opportunity to fire would see the appropriate chit drawn after the ships concerned had moved away presenting their stern galleries for a following rake.
As if to underline the contempt, the Monarch blasted the Batavian flagship, Jupiter, with her brass bow-chasers, only to get a full salute back at short range, the gamble having not quite paid off.
The Monarch got off comparatively lightly with the Jupiter failing to convert a critical hit result to add to the pain of her initial broadside, easily shaking off the resulting strike test for taking a bow rake on her approach.
However the Powerful wasn't so fortunate, taking a well directed broadside from the Haarlem following the Jupiter that caused severe damage with a critical hit resulting in high officer casualties that also saw Captain O'Bryen Drury killed, (I include a test for captain's being killed or wounded whenever a ship get's a 'high officer casualties' result from the critical hits table, thus adding to the narrative of the game) well illustrating the respect needed for Batavian gunnery.
The two flagships Monarch and Juno dishing out the short range broadsides with the Batavian ship carrying a strike test marker
The two leading British third-rates heralded the wave-like attack of the British line as one by one they passed their test to pass through the Batavian line issuing passing stern and often bow rakes to their nearest opponents that left the Batavian line reeling under this first fire, with the two fourth-rates, Delft and Alkmaar bringing up the rear amply illustrating the obsolescence of this rate to take its place in the line of battle, both having their helms shot away in critical hit damage that added to the hits already sustained.
The Powerful 74-guns goes broadside to broadside with Haarlem 68-guns, the latter out of control having lost her helm in the previous rake and both ships carrying red-bordered strike test markers, which both ships would subsequently fail to pass.
The passing rakes were leaving the Batavian line tottering on strike tests as their shattered ships decided whether they would continue to resist, with most passing the test but now having to face the contest fought out on their larboard side.
The two flagships began the contest battering each other at short range in a test of will as to who would concede first, that would see the Jupiter battered into submission over the next couple of turns, losing her main mast and half her guns as the Monarch's got into the rhythm of their gunnery to force the Batavian flag to strike
However the Jupiter was not the first ship to haul down her colours as Alkmaar grabbed that dubious honour, unsurprisingly coming off the worse with a close encounter with Captain Bligh's Director, but was swiftly followed by HMS Powerful, losing her fight with the Haarlem together with her bowsprit which coupled with the loss of her captain seemed to take the fight out of the British third-rate; failing her strike test on an asked for pass of 80% or less and rolling 91%!
As the Monarch and Triumph were entangled with their respective fights with Jupiter and Haarlem, the other British third-rates started to pass through the rearward ships of the Batavian line, whilst the Agincourt, true to form, swung away to a larboard course at medium gunnery range to run a parallel course with the enemy line.
Captain Bligh in the Director 64-guns came up in support of the struggling Powerful, pouring in a stern rake on the Haarlem as she closed to replace the Powerful, now struck and drifting out of the fight.
Behind the Director came the Russell 74-guns, Monmouth 64-guns and the Montagu 74-guns with the first two dismantling the Batavian 56-gun fourth-rates, Delft and Alkmaar with raking fire, causing the latter to strike almost immediately after the punishing fire destroyed her helm and knocked out half her battery of guns.
With the striking of the Delft, soon to be followed by the flagship Jupiter, the Batavians were still fighting hard but teetering on a break-off test, with another two strikes likely to cause those still under orders to make best course for the nearby shoals in the hope of shaking off any British pursuit.
The Cerberus 68-guns makes good her escape as the Agincourt stands off with the Monarch just off her larboard side overseeing the Batavian surrender
The end was not long in coming with the Delft striking soon after the Alkmaar after drawing the attention of both the Russell and Montague, with the former taking a broadside from the diminutive little Batavian 16-gun brig, Daphne trying to offer support to her struggling comrades.
The British attack reaching its climax with the Montagu, Russell and Monmouth battering the two Batavian 56-gun fourth-rates Alkmaar and Delft as they prepare to pass through their line
There are not many historical sea fights involving ships of the line and the smaller fifth-rates, sixth-rates and lesser vessels exchanging fire, with notable exceptions such as the Battle of the Nile when the 32-gun French frigate Sérieuse unwisely opened fire on the British 74-gun third-rates Goliath and Orion, with the latter reducing the frigate to a smoking wreck with a single close broadside in response.
Likewise the Battle of Camperdown was a notable exception, with the Batavian light ships used as a second line to support their main battle line, with one of the Batavian brigs reported sunk in British log books from the battle after receiving return fire.
The Batavian brig Daphne 16-guns opens fire on the 74-gun Russell.
The fire from the Daphne barely scratched the hull of the Russell, however the same couldn't be said for the Daphne as the 32-pounder shot shredded the hull of the brig, leaving a floating mass of matchwood and sealing the defeat of the Batavian rear with just the Cerberus 68-guns and the frigate Monnikendam 40-guns able to escape the table, leaving the British leeward division free to lend their support to the more hard-pressed windward division under Admiral Duncan further along the line of battle.
The British division victorious with five Batavian prizes to secure, and the Powerful now able to honourably run up her colours and make repairs. The escaped Monnikendam can be seen off table to the right, and the furthest Batavian third-rate Cerberus is making good her escape unhindered by the Agincourt on her larboard quarter.
As is my usual practice with my games using KMH, I like to record the damage the players capture on their ship record cards, which help to underline the outcome of any tabletop action and the narrative created, by the damage inflicted on the respective fleets.
The Russell 74-guns, closest to camera, lowers boats to rescue the survivors of the sinking Daphne, now struck, whilst the two surviving Batavians break contact.
The Batavian flagship Jupiter's Ship Record Card (SRC) seen below is illustrative of the battering received once the British opened fire at short range often starting with a stern rake and finishing off the job in another two turns of battle with short range broadsides, her opponent being the British 74-gun Monarch.
The Jupiter battered into submission by Monarch's close range fire.
On a 35% strike level the Haarlem rates as carrying medium damage to her hull principally caused by the stern rake from Triumph and the follow up fire from Director, which also left her without helm control.
As with Jupiter, the hull of the Alkmaar is absolutely shattered, easily explaining her decision to strike.
Like her sister fourth-rate, the Delft is equally battered, losing her mizzen mast from the passing stern rake.
The brave, perhaps foolhardy little brig Daphne illustrates why unrated vessels should refrain from tackling anything much larger than a small sixth rate, that alone a British 74-gun third-rate.
The Monarch made short work of the Jupiter once she had passed her stern, taking most of the damage recorded here from a bow rake by the Batavian in her approach
The Powerful carries the damage from her bow rake received from the Haarlem which left her captain dying and impacted on her ability to rally from the subsequent strike test.
Captain William Bligh, referred to by his crew behind his back as 'the Bounty Bastard', not renowned for his 'man-management' skills, if his captaincy of HMB Bounty and later short lived governorship of the penal colony in Sydney are illustrative, but his performance at Camperdown, showed initiative and determination
The aggressive Director led the charge against the two rearward Batavian fourth-rates, bow raking the Alkmaar, and stern raking the Haarlem as she came up to relieve the Powerful. Her hull damage and lost main-mast illustrates the fight put up by the Haarlem, already victorious over the Powerful, and perhaps the star performer in the Batavian line.
It was great fun reacquainting myself with KMH last played back in October at the NWS meeting in Yeovilton playing the Bantry Bay scenario.
Compared with FDS the game was very different, with KMH putting the players firmly on the quarterdeck of each ship under their command and not quite catching the same feel of playing at the level of an Admiral or Commodore created by the former.
The result was the same, closely following the historical account if you overlook the striking of Powerful with both games giving a very strong narrative to the play with lots of drama and decision points for the players.
That said rules are indeed like golf clubs, designed for a specific job in mind, and FDS is a perfect compliment to recreating a large fleet action in a day of play, whereas KMH is perfectly positioned for squadron level and single ship actions despite our having successfully used it for Trafalgar, where it will give a very entertaining game for multiple players, but where FDS will, I think, give a better portrayal of the battle from the perspective of a senior commander.
Thank you to Ian, Ian T. Sam, Capt. Steve, Paul and Lawrence for creating all the fun and drama in what was a very entertaining game.
All the models are from the Warlord Games Black Seas range and the sea cloths from Tiny Wargames.